Cauliflower Soup

Dec 26, 2011


With the hustle and bustle of the holidays now beginning to slow down, a simple pot of warm, healthy soup is the perfect thing for these last few wintery days of 2011. So go ahead and cozy up with a new book, movie, (or iPad!) and enjoy yourself a steaming bowl of incredibly delicious cauliflower soup.

Now, cauliflower isn't the most flavorful of vegetables... That is, unless it is cooked just right. I particularly love roasted cauliflower, how it transforms into a richly caramelized treat. And now this. This is my new favorite way to enjoy the delicate little "snow-covered trees."

This soup might seem plain, but trust me. Paul Bertolli, often referred to as one of the greatest American chefs, knows exactly how to make a vegetable become the best it can be. This recipe makes for a soup that's delicate, sweet, and silky smooth. 

I hope that you enjoy the simplicity and deliciousness of this soup. And most importantly, I hope you (whoever you are!) have a very, very lovely rest of 2011!

Notes: Be sure to use the freshest cauliflower you can find, as it is the star of the dish. Also, the extra-virgin olive oil and fresh black pepper complete the soup, so I advise against being shy.

Adapted from Cooking by Hand, by Paul Bertolli


Mississippi Mud Pie

Dec 14, 2011


December 14, 2011
Dear Fellow Chocolate Lovers of the World,

      I hope this letter finds you in good health and joyous spirits. Since our last correspondence, I have made a monumental discovery. Dear friends, I have found our Holy Grail of all things good, beautiful, and, most important, chocolate. Yes, indeed. This is it!

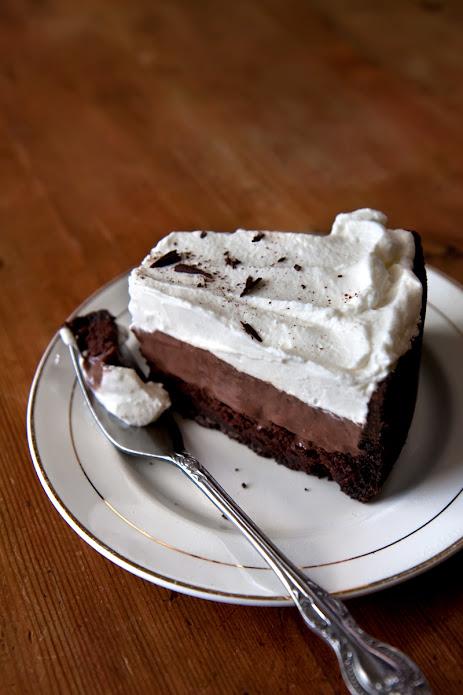
      Behold - Mississippi Mud Pie.


      Versions of Mississippi Mud Pie vary wildly in interpretation and mean many things to many people. Most are encased in some type of cookie crust, though, but whether that be chocolate, graham, or vanilla is up for personal interpretation. To some, Mississippi mud pie includes bourbon and nuts. To others, Mississippi Mud Pie is not really Mississippi Mud Pie without a thick layer of coffee ice cream hiding below a cloud of marshmallows. Despite these differences, the signature of a true Mississippi Mud Pie is that it is chocolate-based in one way or another.

      This version just happens to be chocolate-based in all ways. Or in other words, this is the best one. Ever.

      What makes this Mississippi Mud Pie the best one ever, you ask? Ah, a good question to challenge a bold statement on my part. But I assure you, it won't take much convincing for you to realize the truth of my statement. Now, where do I begin? I supposed the crust would be an appropriate place to start. Encasing the entire pie is a tender, pure black cookie-crumbled crust. It is made from real, homemade chocolate wafers which are then pulverized to a fine crumb and finally mixed with a bit of butter to hold it all together. After the crust has visited the oven for a few minutes, a thick (almost) flourless cake batter is poured in. This layer bakes up into a dense, almost gooey confection; imagine a cross between an intensely chocolaty brownie and a light soufflĂ©. Yeah, it's good. As we continuing moving up the layers we next find ourselves a lovely layer of dark chocolate pudding. Rich with whole milk and a generous bunch of egg yolks, this stuff is creamy, smooth, and purely delightful. And finally, please tell me, what dessert is complete without a great big dollop of lightly sweetened whipped cream on top? None. You are right. Sprinkle on a few pinches of chocolate shavings to make the whole thing look nice and pretty and there you have yourself the best Mississippi Mud Pie. Ever.

      So, my dear chocolate appreciators, make one of these babies for yourselves and you will see. You will see that I have indeed found our Holy Grail.

      Hello, chocolate.

      We love you.

      Forever your all-things-good-beautiful-and-chocolate-loving friend,
      Brooke


Notes: First off, this cake is intense. Intense in every sense of the word, pretty much. That said, it is really amazing. This Mud Pie is worth every single minute you put into it. And, of course, it is so much fun to make! I know it is a long recipe; it does have a lot of steps. The first time I made this cake it took me... all day. I've made it numerous times since then and have found a few short cuts (which I've tried to include below) so it only takes me a couple hours total to whip up. A word of advice: Start the cake in the morning because each of the steps requires a bit of chilling before moving on with the rest of the recipe. So... Also, read the whole thing before you get started, as is always the practice of a good chef.

This recipe is based off the Mississippi Mud Pie in Matt Lewis and Renato Poliafito's Baked Explorations. Their version includes each of the components I include in mine: an (almost) flourless cake baked in a chocolate cookie crust, covered with a rich chocolate pudding and a thick layer of whipped cream. My main tweaks to the original Matt and Renato created are that I make my own chocolate wafer cookies for the crust and I use a recipe from Alice Medrich for the (almost) flourless cake. To save yourself one step in this process, you can certainly use 16 ounces of chocolate wafer cookies instead of baking your own. You will still pulverize the cookies to a fine crumb and mix the crumbs with the 5 tablespoons of melted butter.

You will love.

Chocolate cookie wafers and cake adapted from Bittersweet, by Alice Medrich
Pudding and assembly adapted from Baked Explorations, by Matt Lewis and Renato Poliafito 


Mississippi Mud Pie

chocolate cookie crust

1 cup whole wheat pastry flour
1/2 cup + 1 tablespoon unsweetened cocoa
1/4 teaspoon baking soda
1/4 teaspoon fine grain salt
4 tablespoons unsalted butter, at room temperature
1/4 cup light brown sugar
1/3 tablespoons granulated sugar
1 teaspoon vanilla
3 tablespoons whole milk

4 tablespoons unsalted butter, melted

Preheat oven to 350°F. Place a piece of parchment on a baking sheet. Set aside. Line the bottom of a 10-inch springform pan with a parchment round, then lightly butter the pan and parchment. Set aside.

In a medium bowl, whisk together the flour, cocoa, baking soda, and salt. Set aside.

In a medium bowl, beat the softened butter and sugars until light and creamy. Add the vanilla and milk and mix until well combined. (Mixture may look curdled.) On low speed, add the flour mixture just until incorporated.

Use a small cookie scoop to drop little mounds of dough onto the parchment-lined baking sheet. Using lightly floured hands, press the mounds of dough into 1/4-inch flat disks. (Don’t worry about making these too neat - you’ll be grinding them up shortly.)

Bake the cookies for 10 minutes, until the cookies puff and then settle slightly when done. Remove cookies from the baking sheet and let cool to room temperature. (A 10 minute pop in the freezer works well to speed this process up.)

Place cooled cookies in a food processor. Process until cookies are evenly and finely crushed. Pour the melted butter on top of the crushed cookies and pulse until well mixed. Turn the crumb mixture into the prepared pan and press it into the bottom and up the sides, leaving about 1/2-inch between the top of the crust and the top of the pan. Use the bottom and sides of a cup to get an even, firm layer of crust on the bottom and sides. Place the pan in the freezer and let the crust set for about 10 minutes

Bake the crust until dry to the touch, about 10 minutes. Transfer to a wire rack and let cool.

cake
3 ounces bittersweet chocolate, finely chopped
1/2 cup unsweetened cocoa, sifted
1 cup sugar, divided
1/2 cup boiling water
2 eggs, separated into 2 yolk and 2 whites
1 tablespoon vanilla
1/4 teaspoon cream of tartar
1/4 cup whole wheat pastry flour

Increase oven temperature to 350°F.

In a large bowl, combine the chocolate, cocoa, and 3/4 cup of the sugar. Pour in the boiling water and whisk until the mixture is smooth and the chocolate is completely melted. Whisk in the egg yolks and vanilla, then whisk in the flour. Set aside.

Using a stand mixer fitted with the whisk attachment, combine the egg whites and cream of tartar. Beat until soft peaks form. Gradually sprinkle in the remaining 1/4 cup sugar and beat until stiff but not dry.

Gently fold about a quarter of the egg whites into the chocolate mixture to lighten it. Fold in the remaining egg whites until they are almost completely combined, taking care to not overmix.

Scrape the batter into the cooled crust and level the top if necessary. Bake for about 20 minutes, until just set and a toothpick inserted into the center comes out with a few moist crumbs clinging to it. The cake will develop a bit of a crust on top. Cool on a wire rack for 30 minutes, then transfer to the refrigerator to chill for at least 3 hours. (The cake may sink and crack a little like a soufflé as it cools.)

pudding
3/4 cup sugar
1/2 cup unsweetened cocoa, sifted
1/4 cup cornstarch
1/4 teaspoon fine grain salt
4 egg yolks
2 1/2 cups whole milk
3 tablespoons unsalted butter
2 teaspoons vanilla
3 ounces bittersweet chocolate, finely chopped

As the cake is baking in the crust, prepare the pudding. In a large bowl, whisk together the milk and egg yolks until completely combined. Set aside.

Set a medium saucepan on the stove but do not turn the heat on yet. Add to the saucepan the sugar, cocoa, cornstarch, and salt. Slowly whisk in the milk and egg mixture, starting with just about a 1/2 cup of the milk mixture. Whisk this until it is smooth, then add the rest of the milk mixture in 1/2 cup or so increments until it is all mixed in. The pudding should be very smooth and free of any little lumps.

Turn on the heat and bring the mixture to a boil, whisking constantly to prevent the pudding from burning to the bottom of the pan. Boil for 30 seconds, then transfer it to a large bowl. Add the butter, vanilla, and chocolate. Whisk until combined and then for a few more minutes to cool the mixture slightly. Let the pudding stand for 15 minutes at room temperature then cover with plastic wrap and chill for at least 3 hours.

whipped cream
1 1/3 cups well-chilled heavy cream
1/4 teaspoon vanilla
2 tablespoons powdered sugar, sifted

When all components of the cake are chilled and you are ready to assemble the cake, pour the cream into a bowl and beat with a whisk for about 1 minute or until soft peaks form. Sprinkle the sugar in and add the vanilla. Continue whisking vigorously until stiff peaks form.

to assemble
Stir the pudding to loosen it, then pour it on top of the cake, making sure to stay inside the cookie crust border. Use a spatula to spread the pudding evenly. Return the cake to the refrigerator for at least 30 minutes.

Spread the whipped cream across the pudding layer, all the way to the sides. Sprinkle with chocolate shavings, if desired. Unmold the cake and serve
immediately.

The cake can be kept, covered, in the refrigerator for up to 3 days.

Yield: One 10-inch round cake

Red Lentil Soup

Nov 5, 2011


"Can you believe the surprise!?" my 7-year-old brother asked as he came up the stairs. 

The first snow of the season amazed us all as we climbed out of bed this morning. A half-inch layer of beautiful white fluff veiled the yard and surrounding homes.

It happens every year, but for some reason the first snow of the cold months seems to fill us all with wonder. But how can it not? Glistening and shimmering, creating a pristine white blanket over the earth, you can't help but pause by the window for a moment to take it all in.

The snow outside was the perfect excuse to make a big pot of warm soup for lunch. This lentil and rice soup is a snap to throw together - not fussy at all. Just throw it all in the pot and let it simmer away. Thirty minutes later, throw in a bit of salt, ladle your bowl full, and top it off with delicious things (aka: toasted almonds, crumbled feta, and a bit of extra-virgin olive oil).

I love warm soup.

And I love sparkling snow.

Notes: I make this soup frequently and love it more every time. The toppings are what round everything out just perfectly, so I highly discourage leaving them off. In case you are wondering, this soup freezes very well, which is always nice.

Inspired by this recipe


Pumpkin Yeast Bread

Oct 28, 2011

.
Is that not just the cutest loaf of bread you've ever set eyes on? I know, right? Not only is this loaf shaped like a pumpkin, but it tastes like one, too.

Pumpkin-y goodness.

Oh, yum.


AND!

Lest I commit an unpardonable sin and forget to mention... It makes for just about the best darn French Toast I've ever pulled off the griddle. And I believe that my dear mother would wholeheartedly agree with me. Yes, we love us some pumpkin spice French Toast slathered in butter and topped with plenty of pure maple syrup. Especially on cool mornings like this one, bundled in our fleece pj's, reading the morning paper together.

This, my friends, is what Autumn is all about.
.

Notes: The original recipe calls for exclusively bread flour, but I found it worked wonderfully with a bit of hard whole-wheat, too, and gave it just a nudge more of the heartiness that I love. Use what you have on hand. I suspect that even all-purpose flour would do alright in place of the bread flour, though the dough will not have as strong of a rise or quite as structured of a crumb. Baking this dough in two loaf pans with a few slashes cut on the top of each would work just fine - for convenience's sake on those busy days.

Adapted from The Big Sur Bakery Cookbook


Applesauce Cake with Caramel Glaze

Oct 11, 2011


Welcome, my favorite season of the year! Welcome crunchy leaves, red apples, crisp air, cinnamon, and big cozy sweaters. Oh, how I've missed you so. 

To me, this is the most wonderful time of the year.

If anything says Autumn - it's this cake. Applesauce Cake with Caramel Glaze, to be more specific.

I've made this cake exactly three times in the past week and a half. It's so good I probably should have made it more, now that I think about it in terms of numbers like that. Every time I got out a glass bowl and the mixer, my sister would say something along the lines of, "Let me guess.... The Spice Cake again?" I would proudly answer in the affirmative with a firm nod of my head. And then she would slowly saunter away with a slight grin on her face because she secretly loves this cake as much as I do, but for some reason thinks it's silly that I've made it so much lately. I, on the other hand, will not be shy when it comes to something so perfect for the season. I'll make The Spice Cake as much as I want, thank you very much.

This cake has taken its place as my current favorite (wouldn't ya know!). Thanks to the loads of applesauce, it is so absolutely moist. The applesauce also gives the cake a perfectly subtle apple flavor. And when a generous amount of cinnamon and spice is added, wonderful things begin to happen. AND then.... I won't even say how completely heavenly the caramel glaze is - I'll leave that one up to you to decide as you sneak a taste or two of the dripping glaze. (It's okay. I'll be the first to admit I did it too. Not shy about this cake, remember?)

Please make this cake. You will be filled with all sorts of Autumnal joy if you do. Promise.

Notes: Since my dad tends to two apple trees out back, we have an abundance of canned homemade applesauce in the basement. If you are so inclined, make a quick batch of your own - homemade applesauce is simply the best. It's lovely in this recipe, too - so fresh and flavorful. I made a few of my own tweaks to the original recipe, of course. First of all, I one-and-a-halved the recipe because I like my bundt cakes nice and tall, with about 3 cups of total flour. It's the perfect amount for a 12-cup bundt pan. Also, I used a couple of whole-grain flours along with a bit of all-purpose. If you don't have the whole-grains on hand, certainly all-purpose can be used for all 3 cups of flour. I also decreased the amount of sugar because the applesauce is so sweet itself, I didn't feel that the cake needed any more, especially with the rich caramel glaze. And last, but certainly not least, olive oil replaced the vegetable because I simply love olive oil in cakes like this. It's a barely noticeable taste, but works perfectly here.

Adapted from Food 52


Toasted Barley Salad with Tomato, Zucchini, & Caramelized Corn

Sep 4, 2011

i


With autumn just around the corner, I've been frantically using up the glorious summer bounty our garden has so graciously shared this season. The kitchen counter is practically overflowing with squash, green beans, tomatoes, corn, zucchini, bell peppers, basil, raspberries, and other such lovelies.

The bounty of summer is hard to under-appreciate. Nothing compares to biting into a freshly picked, deep red, juicy tomato. Really, nothing quite does. Likewise, an ear of grilled corn slathered with butter and sprinkled with a bit of salt epitomizes summer. All of this and the long, lazy summer evenings on the back porch surrounded by great company are the things I will miss most. 

This end-of-summer salad was inspired by that abundant harvest of fresh produce consuming the kitchen counter. It's kind of like summer on a plate - fresh and bright. I hope you'll enjoy it as we begin our farewells to this wonderful, generous season.

Notes: This kind of salad is the perfect dish for a picnic or a long, lazy summer lunch because it gets better as it sits and marinates in the dressing. Serve it with grilled meats or fish as a side dish, or with plenty of lightly cooked vegetables as a vegetarian main course. The salad is also very open to  adaptations based on what the garden is producing. Feel free to even add some toasted nuts for a bit more crunch.

Adapted from here

Gnocchi with Fresh Basil & Italian Parsley

Aug 23, 2011


per·fect gnoc·chi (according to Brooke), n.
1. Light, delicate, billowy dumplings. Crisp on the outside. Creamy, buttery, rich on the inside.
2. A little bit of heaven.

All I want to say today is this: If you can make perfect ricotta, you can make perfect gnocchi.

It's just about that simple.

And then all you have to do is throw in a few handfuls of fresh basil and fragrant parsley and you've got yourself a little bit of gnocchi heaven.

Just sayin'.

Notes: This recipe is best when made with fresh ricotta (as we made here), but I don't see why store-bought wouldn't also work in a pinch. Just keep in mind that the cheese from the grocery store is not as moist as homemade, so I'd start with a little less flour so the gnocchi don't end up too dry or tough. Also, you can serve the gnocchi with whatever toppings or sauces you fancy. I love the simplicity of fresh herbs to really showcase the creamy, buttery flavor of the gnocchi while letting the herbs have a bit of a shining role, too. Any kind of pesto would dress the gnocchi up nicely, as well, or perhaps a simple garlic, tomato, and prosciutto sauce. The possibilities are endless, really, so experiment with whatever your heart desires. One final thing: If you would like to freeze the gnocchi for later use, do so just after cutting the dumpling pieces. Arrange the gnocchi in a single layer on a baking pan and place the pan in the freezer. Freeze until solid, about 3 hours. Place the frozen gnocchi in an appropriate container. To cook, boil as directed below, with no need to thaw the dumplings.

Adapted from a recen
t Instructional Dinner I attended at one of my very favorite restaurants


Ricotta Cheese

Aug 2, 2011


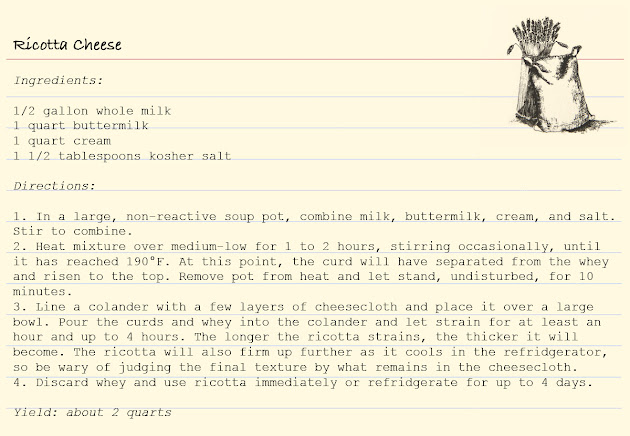
I've heard it said that cheese is milk's attempt at perfection. Frankly, I think cheese does a pretty fabulous job at perfecting milk... Not that milk is totally imperfect (a tall glass of whole milk is amazing, yes? Especially when paired with one of these bad boys.), but the right kind of cheese easily spells out perfection to me.
That said, the ricotta cheese at the grocery store doesn't do a very good job at trying to be perfect milk. Store-bought, generic ricotta simply holds nothing to the homemade stuff. It is f-a-r from perfect. Sure, the store-bought stuff works in a pinch or if it's not the star of the recipe, but if you haven't ever tasted homemade ricotta, you haven't tasted perfect ricotta. This stuff is so rich and creamy you'll probably think you're dreaming.
Please taste it. It will change your life... Or at least your understanding of perfect milk.
Notes: This makes a whole lot of ricotta. I haven't tried freezing it, but I have heard it might work... You could easily half the recipe, but you'll probably be like me and love the stuff so much that you'll find every excuse to use it. For example: Smeared on toast with a drizzle of honey and a pinch of salt, as a sandwich spread, dolloped on a plate of pasta, or made into gnocchi (one of my absolute favorites!).
Adapted from a few sources and my head :)

Chicken & Shrimp Curry with Peanut Drizzle

Jul 3, 2011


Sunday afternoons are pretty relaxing around our house. You can usually find someone lying on the couch with the day's newspaper and another curled up close by with a nice thick book. The little ones will usually occupy themselves with their favorite toys in some remote corner of the house or by running around out back with the puppy. As for me, I'm usually taking advantage of the workless day to create something delicious in the kitchen. Something delicious - like this.

This is one of our favorite dishes for a Sunday afternoon dinner.

At first glance, it seems a bit intimidating by the long list of ingredients, but don't be fooled - it all comes together within an hour or so. And it is worth every minute of that hour, I promise. The peanut sauce takes this curry dish over the top. (As we've determined previously, peanut butter is excellent in just about any form.) With a few fresh vegetables, a bit of rich coconut milk, and some plump shrimp, you've got yourself a comforting meal for a relaxing Sunday afternoon. Or any afternoon, for that matter.

Notes: Be sure to read through the entire recipe before beginning so you know what to expect. (i.e. There are a few garnish items that need toasting, which can be done in a few minutes in a pan set over medium heat.) Also, this method of cooking rice is my favorite. It is fool-proof and produces fluffy, perfect rice every time. And finally, this dish can easily be made vegetarian by simply omitting the chicken and shrimp. It'll still be fabulous, I'm sure.

Loosely adapted from here, where it is known as "Bang Bang Chicken & Shrimp"


This post linked to Real Food Wednesdays

Avocado & Tomato Tartine

Jun 18, 2011


Sometimes the best things are simple things, yes? Actually, I might argue that usually the best things are simple things.

Like a slice of fresh, piping-hot bread from the oven smeared generously with salted butter.

...or a just-picked tomato, eaten like an apple.

...or a halved avocado in one hand and a spoon in the other.

...or the smell of fresh feta cheese.

Over-complicating is totally over-rated.

Avocados and tomatoes are pretty simple and we all know that feta is what makes the world go 'round. So why not combine the three for a delicious tartine? Well, I did just that and what I'm sharing with you today is a humble, not-quite-recipe that is a favorite of mine.

I've enjoyed this tartine equally well for breakfast, lunch, or dinner. I suppose you could even go for all three on the same day. Now, how's that for simple!? Believe me, I've been tempted. One bite and you'll know what I mean.


Notes: This tartine is amazing when made with this sandwich bread, though any fresh whole-grain bread will do. Also, of course the best tomatoes are those just picked - either from the garden out back or the Saturday market. Nothing beats wonderful summer produce!

A Flour Sack original
Avocado & Tomato Tartine

1 ripe avocado, peeled
1 tablespoon fresh lemon juice
Pinch of fine-grain sea salt, to taste

2 slices whole-wheat sandwich bread, toasted
1 fresh tomato, sliced
A bit of crumbled feta cheese

In a small bowl, mash the avocado with the lemon juice and salt.

Spoon the avocado mixture on each slice of toasted bread and spread to the edges. Top each tartine with a few tomato slices and sprinkle generously with feta cheese.

Yield: 2 tartines
This post linked to Real Food Wednesdays and The Nourishing Gourmet

Oatmeal Pancakes with Blueberry Maple Compote

Jun 4, 2011


What were you doing at 4 am this morning? Sleeping, I hope.

I'm usually sleeping at that hour, too. Not today, though. Nope, I wasn't asleep.

I was awake. Do you ever wake up early (as in, super early), still exhausted as can be, with a million thoughts running through your head? And you lay there for hours upon hours mad at your silly little noggin' for being so rude to keep you from your beauty sleep? I do. That's why I was awake at 4 am this morning.


Well, as it happens, one of those million thoughts running through my head was something like, "Hmmm.... Since I'm just laying here with nothing to do (heaven forbid I actually sleep!) in my pitch-black room, what'll be for breakfast today?" A few things crossed my mind but I promptly settled on oatmeal pancakes with blueberries because, well, it sounded scrumptious. I eventually made my way up to the kitchen (still pitch black out, yes), pulled out a few bowls and the griddle, and made a batch of my favorite pancakes.

Lending moisture and texture, the cooked oatmeal in these pancakes makes them extra-tasty. A bit of molasses compliments the nutty oats quite nicely. And when served warm with a bit of blueberry compote, you've got yourself a pretty good reason to get up early (meaning 7 or 8 am, not 4).

Notes: You can use all-purpose flour instead of the whole-wheat pastry, if that's what you have in your cupboard. Also, frozen or fresh berries will work equally well in the compote.

Pancakes adapted from Good to the Grain, Blueberry-Maple Compote a Flour Sack original


This post linked to Read Food Wednesdays and The Nourishing Gourmet

Chocolate Chip Cookies

May 31, 2011


Okay. So let's avoid all the flowery ho-hum and get right down to business, people. These cookies are A-MAZ-ING. They are so good, in fact, that I just might call them The Greatest Chocolate Chip Cookies Ever to be Invented by Man. Actually, I just decided - I will call them that. Here, before your lucky little eyes, you see The Greatest Chocolate Chip Cookies Ever to be Invented by Man. I know that's saying a lot. But seriously, you have to try these.


Everyone's got their favorite. These are mine.

By far.


Here is why:

1. They're BIG.
2. They're crispy and a little crunchy on the edges.
3. They're gooey and chewy in the middle.
4. They're mostly about cookie goodness - not so much about tooth-aching sweet.
5. You put salt on top, which sounds weird, but is so wonderful.
6. They have an amazing complex, caramelized, sophisticated flavor. Really.
7. They have lots and lots of delicious chocolate pieces inside them. Each bite is like a fantastic chocolate circus in your mouth. Amazing, right? I know, tell me about it.
8. And... Okay, I just love them. I could eat them all day long. And all night long, too. (If I could eat while sleeping, that is.)


So make them. (And please read the notes below. They are very important.)

Happy cookie making, cookie dough sneaking, and cookie nirvana eating.

Notes: I think there are three things that this recipe really has going for it: 1) The combination of bread and cake flours. The texture of these cookies is awesome. Most cake flours are bleached, which means lots of processing and chemicals. I use King Arthur's brand of cake flour, which is unbleached. 2) Let the dough rest for at least 24 hours, as the recipe states. It's amazing the transformation the flavors take on. So worth it. The resting allows the liquids in the dough to be absorbed, giving you a firmer dough that bakes up into thick, chewy, caramel-y, sophisticated cookies. And, 3) Please use some really good-quality chocolate here. I love Ghiradelli's 60% cacao bittersweet baking chips. They're find-able, affordable, and de-lish. I use about two cups of the chips as they are, and then I roughly chop the remaining 1/2 cup to distribute even more chocolate in each cookie. If you want to splurge, (oh man!) go for these. Or these. Oh, annnd also, sometimes I like to add about 2 cups of chopped, toasted walnuts or pecans. Your choice.

Adapted from The New York Times, courtesy of this gentleman. Let's just call him the Chocolate Genius, shall we?


This post linked to Real Food Wednesdays and Sweet as Sugar

Peanut Butter Sandwich Cookies

May 29, 2011


Raise your hand if you like peanut butter. Ah, yes, I see. You all do. That's good. I do too. In fact, I really like peanut butter. I didn't always, though. You see, when I was little, the only thing "peanut butter" that I'd eat was Reese's Peanut Butter Cups. No PB & J sandwiches, no PB cookies, and certainly not a scoop right from the jar! The horror.

One time I remember I had the hick-ups and my sister told me that if I wanted to get rid of them I'd have to eat a spoonful of peanut butter from the jar. I must have been pretty desperate for a cure because I somehow summoned the courage and did that thing where you plug your nose so you can't taste what's in your mouth. As soon as the peanut butter was down, I unplugged my nose and remember immediately tasting what I then thought was a repulsive flavor. (Annnnd it didn't even cure my hick-ups! What a crock.)

I'm not sure what remedied my dislike of peanut butter, though I do remember an instance when I realized it might not be too bad. I was probably in the 5th grade when I came home from school one day to quite the surprise. Mom had just pulled fresh cookies out of the oven and there they sat, warm on the counter. I was so excited because this pretty much never happened. Mom said they were Peanut Butter Chocolate Chip Cookies. Immediately I fell from pure elation at the fact that Mom had made cookies to utter disappointment that they were peanut butter. "She finally makes cookies for an after school snack and she makes peanut butter cookies?!" Well, I was somehow convinced to try one and lo and behold! I liked it. Loved it, actually. And that was that. Now I would eat Reese's and Mom's Peanut Butter Chocolate Chip Cookies. Progress...


Which brings us to today. I'm happy to report that I've made even more progress. (I feel like I'm reporting to some recovering addict group or something when I say that...) Though I don't find myself practicing restraint when a jar of peanut butter is near and I have a spoon in hand, I do like me some peanut butter. Preferably with a little oatmeal, flour, butter, and sugar. But that's the best way to have most things, wouldn't you agree?

I think it would now be appropriate for me to share the recipe for Mom's Peanut Butter Chocolate Chip Cookies. But we have a problem, because I didn't make them. Soooo, I'll make them soon-ish and then you'll all see why they cured me of Peanut-Butter Hate. But for now, these little sandwich treats are amazing. You're not receiving the short end of the stick by not getting Mom's cookie recipe today, I promise.

I've made these little guys many, many times and they do not disappoint. Consider them a more-refined version of peanut butter cookies. These cookies are delicate yet full of peanut butter flavor. They are nutty and creamy and crumbly and they melt in your mouth like only a good peanut butter cookie can do. I don't really know what else to say about them except that they are SO good. And I really want you to make them because, as we have just established, we all love us some peanut butter, right?

Notes: I've made my regular substitutions to the original recipe, but if you don't have whole-wheat pastry flour or sucanat, you can use all-purpose and brown sugar in their place. The filling recipe makes more than I've ever needed for one batch, but I suppose it all depends on how much filling you like in your cookies. Try the whole recipe for the filling and if you have left-overs, hey, you've got an excuse to make more cookies, right? Also, I discovered that I prefer these straight from the freezer. They don't get rock-hard like most cookies do when you freeze them for some reason, they just get really good. How's that for vague? :) Of course, they're lovely at room-temperature, too. Enjoy!

Adapted from Martha Stewart


Spinach Strata

May 25, 2011


The garden out back is beginning to produce an array of beautiful vegetables. My dad is an avid gardener, and those vegies are like his little babies. He grows everything from seed - beginning in a make-shift "greenhouse" he places beside our grand piano. As the weeks progress, the little black tubs of plants begin to overflow and create a small forest in the front room. (Apparently this is the best space in the house for as much sunlight as possible. He says he needs the space until he builds himself a real greenhouse outside. Mom is very patient and goes along with it well... Happy to see the fruits of her husband's in-door jungle when she bites into a juicy, ripe, rosy-red tomato in August.)


We've been munching on crisp spinach leaves for several weeks now. The earthy, fresh flavor of just-harvested greens is hard to beat. To me, spinach + olive oil + lemon is a trio made in heaven. At dinner, I love the leaves dressed simply - with a drizzle of olive oil and a squeeze of fresh lemon. But at breakfast, fresh spinach decorated throughout a rustic strata and combined with a bit of feta and oregano is the perfect way to start the day.

I have been making this strata almost weekly since I first discovered it. It is hearty, moist, and extremely flavorful. The top gets nice and brown in the oven, creating a lovely crunch. I admit, I've been guilty of stealing extra crispy bits to put on my breakfast plate. With the subtle, light taste of lemon, a bit of olive oil fruitiness, and a little saltiness from the feta, this strata is wonderful. I might also add that it is a snap to mix up. You put it all together the night before you want to serve it, and then bake it in the morning. I think this strata is a perfect way to use some of the abundant spinach out back. Dad agrees.

Notes: I've increased the bread quantity slightly because I found the strata a bit wet with just the 8 ounces originally called for. If you don't have day-old bread, you can dry fresh bread in an oven heated to 250°F for 10 to 15 minutes. I've been making this with regular homemade whole-wheat sandwich bread, but any dense whole-grain bread will do.

Adapted from Super Natural Every Day


Barley & Millet Risotto

May 21, 2011


Arborio rice is an Italian short-grain rice that is traditionally used to make risotto. When cooked, the grains become creamy and chewy - perfect for a comforting dish like risotto. Here, instead of using the traditional arborio rice, I used barley, which still creates that creamy, chewy texture, but is a bit more wholesome. The addition of a little millet to this risotto is also nice - for added nutrition, texture, and flavor. This risotto makes for a lovely lunch or a nice side dish for dinner.


Risotto can be adapted a million different ways. The version I have pictured includes some quartered cherry tomatoes, toasted almonds, a bit of fresh oregano, and a drizzle of olive oil. You can use this risotto recipe as a springboard for all kinds of flavor combinations. I have included a few of my own ideas in the recipe below, but definitely experiment. And if you do, let me know what you like!

Notes: If you'd like to make this a full meal that is a little more substantial, you might try some grilled chicken or a fried egg on top. If you are lucky enough to find it, farro is a great and delicious substitution to the barley, but both work equally well.

Adapted from 101 cookbooks


This post linked to The Nourishing Gourmet

Rosemary Olive Oil Cake

May 20, 2011


Upon first seeing this recipe, I thought it sounded a little... strange. Rosemary is a savory ingredient and chocolate is not, though I found the idea of combining the two intriguing. Sometimes opposites compliment each other, as this cake clearly demonstrates. I've found that in cooking and baking it's often these kind of unexpected pairings that bring complexity and intrigue to the final product. Such trials of seemingly-unusual flavor pairings make spending time in the kitchen so exciting and fun for me. Especially when the results promise such a stunning treat.

This cake is one of my absolute favorites. Rosemary, chocolate, and olive oil create a memorable and interesting-in-a-very-good-way cake that is completely delightful. Each bite is flecked with rosemary shards and chocolate pieces. The olive oil brings a subtle fruitiness and keeps the cake extremely moist. Although the rosemary is not overpowering, it adds a subtle complexity to the cake that is most delightful.

So here I present my idea of a perfect snack cake, if there ever was one. I really hope you'll give it a try. You might be surprised just how much you love this cake.

Notes: I have baked this cake is several different pans. My latest favorite pan to use is a new, small, 6-cup bundt (as shown above). You can also bake it in a 9x5 loaf pan, a 9-inch cake pan, or a 9-inch flauted tart pan. The sugar sprinkled over the top of the cake adds a wonderful crunch. I left it off in the picture above because I planned on inverting the cake, but then decided that I liked the rustic look of the 'underside' and made that the top. And finally, if you prefer, you may substitute all-purpose flour for the spelt and whole-wheat.

Adapted from Good to the Grain

Roasted Butternut Squash Soup with Sage Croutons

May 19, 2011


Since Spring just can't decide if it's time to arrive in this part of the world or not, I've taken advantage of the wet, cold, totally-un-spring-y weather, and have been making soup. Lots of warm soup. You'd think it was winter or something.

Anyhow, this soup is my favorite butternut squash soup I've tried. I've made variations - some with apples, others with mascarpone cheese, and a few with curry. But this simple version I'm sharing today brings out the flavor of the butternut just perfectly so that it is the star. No distractions here - just sweet, earthy squash - accentuated by a touch of sage and a little garlic. Sage is a natural companion to butternut squash, to which pairing I am partial. It's one of my favorite fall flavor combinations. (Ahem... fall? I know, it's May, right?)

So if your neck of the woods is experiencing a delightful sun-shiny springtime, maybe bookmark this soup for use in a few months, and be looking forward to it!

Notes: I made just a few changes to the recipe - adding a little more garlic and adjusting the roasting method a little. The sage croutons are wonderful, by the way. They add a pleasant crunch. If you are running short on time, you can leave them off, but just plan to make them the next time around - you'll be glad you did.

Adapted from Cooking After Five

Oat Soda Bread

May 11, 2011


Do you ever crave fresh homemade bread but don't have the time or patience to wait a few hours for yeast to work its magic? I certainly do. And lucky us, I have the solution to our little predicament right here. It's called soda bread. Have you heard of it? Soda bread isn't made with soda - as in soda pop - no, soda bread is made with baking soda as the leavener, and when combined with buttermilk, wonderful things happen, like bread rises.

Soda bread is known for its very short ingredient list, usually going something a little like this: flour, baking soda, salt, and buttermilk. Sometimes people like to add raisins or nuts to their soda bread, but I like to keep mine pretty simple. Here is a wonderful version of soda bread made with oats, which provide just a touch of sweetness and texture.

Delicious, warm, hearty homemade bread in less than an hour? Yep. I speak the truth. Serve this bread warm with a slather of salted butter, or alongside a steaming bowl of soup, even toasted with a shmear of peanut butter... you can imagine the possibilities. I told you I had the solution to our little predicament. And a pretty darn good solution it is, might I say.

Notes: This recipe calls for oat flour. If you are more likely to have some rolled oats on hand, I've included below the recipe how to make your own oat flour with rolled oats. If you already have oat flour in your pantry, go ahead and use it! Also, if you would like, you can use a full 2 1/4 cups of all-purpose flour, instead of the whole-wheat pastry and all-purpose combo.

Adapted from 101 cookbooks

Quiche Lorraine

May 10, 2011


My dad is quite the cheese, bread, and pastry connoisseur. Living in southern Belgium and northern France for a couple of years can do that kind of thing to you, especially when you're a young guy spending your days on feet in the towns and cities. I wonder how many stops in the abundant patisseries and chocolate shops he took. (What a life!) Anyway, a few years ago, he took one of my sisters and me on a 2-week vacation to Europe. We visited France and Belgium during our stay and also took a detour through Holland, where our ancestors are from. If asked to choose my favorite place we visited during our trip, I wouldn't be able to. There are aspects about each country that I fell completely in love with. The windmills of Holland are incomparable, while Belgium boasts world-class frites. France, of course, with the Eiffel Tower and the Louvre, is simply top-notch.

While staying in Paris, the three of us would grab a quick bite every morning at a little patisserie just around the corner from our hotel. This cute shop had it all: all kinds of baguettes, eclairs, tarts, mille feuilles, macarons, croissants, gateaus, and quiche. Oh, the quiche! I would order a quiche lorraine every morning and enjoy it on the park bench outside. The quiche at this little patisserie were perfect - a lovely buttery and flaky crust encompassed a rich, smooth custard that had just the right amount of bacon and onion. If only I could start every day just that way - sitting on a park bench in France with a quiche in hand.

Until I make it back to that French patisserie, I will have to do with my own version of quiche lorraine. Wait, did I just say "have to do"? Actually, I don't think this quiche merely "has to do" in place of an authentic French one, because it is wonderful, if I do say so myself. While enjoying our dinner the other night, I asked everyone's opinions of the quiche. In the words of my dad, "This is just as good as any I've had in Europe - if not better!" And then he helped himself to another slice.

It is so good.

Notes: Yes, the recipe is long. Yes, it takes time and a bit of planning ahead. Yes, it is worth it. Start the crust just after lunch and you should be prepared. Read the recipe through all the way before beginning, too, as is always wise. I made this recipe exactly as it was originally written, with exclusively all-purpose flour. I think I'll try it again using half whole-wheat pastry flour; I expect that it would work quite well. The authors note that to prevent the crust from sagging during the blind baking step, you need to make sure that it overhangs the pan's edge and use plenty of pie weights - about 3 to 4 cups. Also, it is important to note that this is a deep dish quiche, which is more authentic to the region from which it hails (France!). This recipe has been created for a 2-inch-deep cake pan to accommodate all of the filling - be sure to use the correct pan! I think you could easily use a 9-inch spring-form pan, too, because they tend to be at least 2-inches deep.

Adapted from Cook's Illustrated, July & Aug. 2010

Related Posts Plugin for WordPress, Blogger...

The Flour Sack All rights reserved © Blog Milk Powered by Blogger