Quintuple Chocolate Brownies

Oct 23, 2012


quin·tu·ple  [kwin-tuhp-uhl]   
adjective
1. fivefold; consisting of five parts.

Yes, I managed to put five different kinds of chocolate into one brownie. Why? Um.... Because chocolate is obviously the best food group ever invented. And also because brownies are obviously the best vehicle for consuming the aforementioned best food group. Obviously.

Let me explain...

Last spring my mom and I got to spend 10 days in England. We went in celebration of my graduation from college and it was one of the best trips ever. We had such a blast and loved every minute of our time there. It was wonderful to be back in the stunning country that we grew to love so dearly when we lived there years ago. It is our second home, you might say, and I daydream of it often.

While out in the country one day, we stopped at a little tea shop and had lovely lunch. After our yummy sandwiches were gone and the meal had been paid for, I stopped to oodle at the glass case full of delectable baked goodies. 

And then... She brought them out. From the back kitchen with a plate full of warm, deep, dark, eat-me-now-and-you-will-never-love-another-brownie-quite-like-me-again brownies she came. 

I just couldn't not. So I asked for one ("...without an edge, please."), paid for it in pounds, and walked out into the crisp England air. 

It has been since that very day, that very first nibble outside of Collington's Tea Shop on the  cobblestone street of Brampton, England, that I declared that I would recreate that exact brownie.

And now, over a year later, and... 20-ish (?!?) pans of brownies... Here they are. 


Oh my goodness. These are the most chocolatey brownies. (Remember the quintuple part?) They are so moist and rich. They are also perfectly thick, hefty, and not-too-gooey-but-still-gooey brownies you will ever meet. They are the brownies that remind you why the chocolate food group was ever invented in the first place.

A simple word of advice: I think the brownies are at their peak approximately 1.5 hours after being removed from the oven (but who am I kidding, they're insanely wonderful any time...) because then they've set up nicely, are still warm and oh-so-rich, and the milk and white chocolate chunks inside stay soft and melty.

Mmmm... Chocolate seriously doesn't get any better than this.

Go make yourself a batch of Quintuple Chocolate Brownies and you will never love another brownie quite like these again. 

Guaranteed.

Notes: First thing: Use really high-quality chocolate (I prefer Callebeaut or Scharffen Berger). It definitely makes a difference. Second: Of course I had to create these brownies with whole-wheat flour, and yes, it works absolutely wonderfully here. I made a slight adjustment to the original quantity of flour because I added the whole-wheat, so if you are using all-purpose, increase the flour to 5 ounces. Third: I also found that, because of my addition of white and milk chocolate chunks, these are best with  slightly less sugar in the batter than the original recipe called for, so the recipe below reflects this adjustment as well (the original calls for 8 3/4 oz (1 1/4 cups) sugar). And one more thing: I bake these in a 7x7 baking pan so that they're even more thick, but an 8x8 also produces a hefty brownie just fine. Other than that... Enjoy your chocolate-loving hearts out!

Inspired by the brownies at Collington's Tea Shop in Brampton, England
Brownie base adapted from Cook's Illustrated's Chewy, Fudgy Triple Chocolate Brownies

Quintuple Chocolate Brownies

5 ounces bittersweet chocolate, roughly chopped
2 ounces unsweetened chocolate, roughly chopped
1/2 cup unsalted butter, cut into quarters
3 tablespoons cocoa

3 eggs, at room temperature
7 1/4 ounces (3/4 cup + 2 tablespoons) granulated sugar
2 teaspoons vanilla
1/2 teaspoon sea salt

4 ounces (1 cup) whole-wheat pastry flour
3 ounces high-quality white chocolate, cut into 1/4-1/2 in. pieces
3 ounces high-quality milk chocolate, cut into 1/4-1/2 in. pieces

Heat oven to 350°F. Butter a 7x7 in. (or 8x8 in.) baking dish, then line the dish with parchment so that there is an inch or two of extra parchment hanging over the sides (to help you lift the brownies out). Butter the parchment. Set aside.

Place a medium glass bowl over a pan of almost-simmering water. Melt bittersweet and
unsweetened chocolates with the butter, stirring occasionally until the mixture is smooth. Whisk in cocoa until smooth. Set aside to cool slightly.

In a large bowl, whisk together the eggs, sugar, vanilla, and salt until combined, about 15 seconds. Whisk warm chocolate mixture into egg mixture, then stir in flour with a rubber spatula until just combined. Gently fold in white and milk chocolate pieces until evenly distributed throughout the batter.

Pour batter into prepared pan. Spread batter into the corners and level the surface with the rubber spatula. Bake brownies until slightly puffed and a toothpick inserted in the center comes out with a small amount of sticky crumbs clinging to it, about 33-38 minutes.

Allow brownies to cool completely on a wire rack to room temperature, about 2 hours. Remove brownies from pan using parchment overhang. Cut into 9 or 12 squares and serve.

Yield: 9-12 brownies, depending on the size you cut them

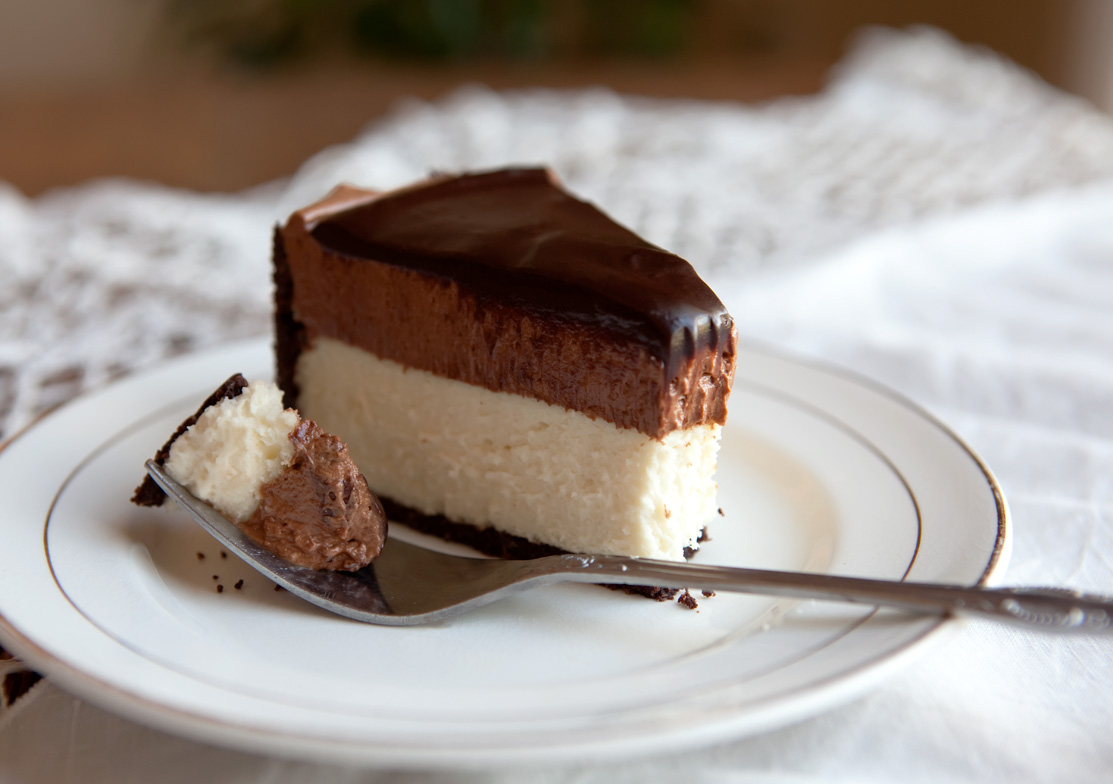
Chocolate Mousse Cheesecake

Sep 15, 2012


"This should be illegal. I mean, I should be arrested for eating this."

That's a direct quote from my mother, spoken yesterday at 8:42 a.m.

We consider this our new favorite dessert. 

Or breakfast, cause that's the way we roll sometimes. 

We haven't been arrested by the Incredibly-Dreamy-Cheesecake Police yet. And by Incredibly-Dreamy-Cheesecake Police I mean that the cheesecake is incredibly dreamy, not the police. I haven't seen them yet to make that judgement. 

The only judgement I have been able to make is that this cheesecake really is dreamy. It is decadent. It is smooth and silky with a slight crunch from the crust. Rich. Every layer compliments each of the others brilliantly. It is simple perfection. 

Yes, there are a lot of steps to making this cheesecake, but I guarantee it will be so worth it

... Even if the cheesecake police that come to arrest you aren't all that dreamy. At least the cheesecake you made was. ;)

Notes: Read through the entire recipe before beginning. I repeat: Read through the entire recipe before beginning! You'll need to plan a few things in advance, such as having softened butter and cream cheese around, time for the cheesecake to completely cool, etc.

Idea adapted from Mangio da Sola
Chocolate Cookie Crust adapted from Alice Medrich
French Mousse adapted from Tyler Florence
Creamy Cheesecake adapted from Dori Greenspan

Chocolate Mousse Cheesecake

bottom layer - chocolate cookie crust
1 cup whole-wheat pastry flour
1/2 cup + 1 tablespoon unsweetened cocoa
1/4 teaspoon baking soda
1/4 teaspoon salt
4 tablespoons unsalted butter, at room temperature
1/4 cup brown sugar
1/3 cup granulated sugar
1 teaspoon vanilla
4 tablespoons milk

3 tablespoons unsalted butter, melted

Preheat oven to 350°F. Place a piece of parchment on a baking sheet. Set aside. Line the bottom of a 9-inch springform pan with a parchment round, then lightly butter the pan and parchment. Set aside.

In a medium bowl, whisk together the flour, cocoa, baking soda, and salt. Set aside.

In a medium bowl, beat the softened butter and sugars until light and creamy. Add the vanilla and milk and mix until well combined. (Mixture may look curdled.) On low speed, add the flour mixture just until incorporated.

Use a small cookie scoop to drop little mounds of dough onto the parchment-lined baking sheet. Using lightly floured hands, press the mounds of dough into 1/4-inch flat disks. (Don’t worry about making these too neat - you’ll be grinding them up shortly.) Bake the cookies for 10 minutes, until the cookies puff and then settle slightly when done. Remove cookies from the baking sheet and let cool to room temperature.

Place cooled cookies in a food processor. Process until cookies are evenly and finely crushed. Pour the melted butter on top of the crushed cookies and pulse until well mixed. Dump the cookie mixture into the parchment-lined springform pan. Press the mixture evenly up the sides of the pan, then evenly over the bottom.

Wrap the bottom of the springform pan in a double layer of aluminum foil. Place the crust in the freezer for 10 minutes. Remove the crust from the freezer and bake for 10 minutes, until set and dry to the touch. Let the crust cool on a wire rack while you make the cheesecake.

layer 2 - creamy cheesecake
1 pound (2 8-ounce packages) cream cheese, at room temperature
2/3 cup granulated sugar
1/4 teaspoon salt
1 teaspoon vanilla
2 eggs, at room temperature
2/3 cup heavy cream

Decrease oven temperature to 325°F. Put a pot of water on the stove top boil.

Working in a stand mixer fitted with the paddle attachment, beat the cream cheese at medium speed until it is very soft and smooth, about 4 minutes. Add the sugar and salt, and continue to beat at medium speed for another 4 minutes or so, until the cream cheese is light. Beat in the vanilla. Add the eggs one by one, beating for a full minute after each addition to yield a well-aerated batter. Reduce the mixer to low speed and mix in the heavy cream.

Give the batter a few stirs with a rubber spatula to make sure that nothing has been left
unmixed at the bottom of the bowl. Scrape the batter into the cooled cookie crust. The batter should fill about half way up the pan. Place the springform pan in a roasting pan large enough to give at least a 1-inch space between the cheesecake and the roasting pan. Place in the center of the oven and then carefully pour the boiling water into the roasting pan to come halfway up the sides of the springform pan.

Bake the cheesecake for about 45 minutes, at which point the top will be ever so slightly browned and the cheesecake will have puffed a little. The best way to tell if your cheesecake is done is to insert a thermometer into the center; it should read 150°F.  Remove cheesecake from from the roaster pan - be careful of the hot water - and remove the foil. Place cheesecake on a wire rack. Prop a large bowl over the cheesecake, leaving a 1-inch crack to let the cheesecake cool slowly.

When the cake is cool, cove with plastic wrap and chill in the refrigerator for at least 4 hours, or overnight.

*** Make the mousse once the cheesecake has cooled.***

layer 3 - french chocolate mousse
6 ounces semi-sweet chocolate, chopped
3 tablespoons unsalted butter
3 eggs, separated
1/2 teaspoon cream of tartar
1/4 cup + 2 tablespoons granulated sugar
1/2 cup heavy cream, cold
1/2 teaspoon vanilla

Set a heat proof bowl over a saucepan of gently simmering water. Put the chocolate and butter into the bowl. Melt the chocolate and butter together, stirring with a whisk, until smooth. Remove from heat and cool slightly. Add the egg yolks to the chocolate one by one, beating with a whisk until incorporated. Set aside.

In another bowl, beat the egg whites until foamy. Add the cream of tartar and continue to beat. Gradually add in 1/4 cup granulated sugar and continue beating until stiff peaks form. Set aside.

In another bowl, beat the heavy cream until it begins to foam. Add the vanilla and remaining
2 tablespoons  sugar. Continue to whip the cream until it holds soft peaks. Set aside.

Gently fold 1/4 of the egg whites into the chocolate mixture to lighten it. Fold in the remaining egg whites. Then, delicately fold in the whipped cream. Take care to not over work the mousse, but make sure the cream is blended in well.

Using a rubber spatula, spread the mousse on top of the cooled cheesecake while still in the springform pan. Cover with plastic wrap.

*** If making the ganache immediately, place the mousse-covered cheesecake in the freezer as you make the ganache. (The cheesecake should NOT be in the freezer for more than 30 minutes.) If making the ganache later, place the cheesecake in the refrigerator for a few hours. ***

top layer - ganache
1/2 cup heavy cream
5 ounces bittersweet chocolate, chopped
1 teaspoon vanilla

Place the chopped chocolate and vanilla in a small bowl. Set aside.

Heat the cream in a small sauce pan over medium-low heat until the point just before it boils. Pour hot cream over chocolate and vanilla. Whisk the mixture until smooth. Allow ganache to cool for about 15 minutes.

Remove mousse cheesecake from the freezer or refrigerator. With an offset spatula, smooth the ganache while starting at the center of the cake and working outward. Be aware that the cold temperature of the cake will cause the ganache to firm up, so work fairly quickly.

Release the springform pan and cut cheesecake with a sharp knife to serve. Store cheesecake in the refrigerator, covered tightly with plastic wrap.

Yield: 1 9-inch cheesecake, serving 10-12

Raw Chocolate Peanut-Butter Bars

Aug 3, 2012


A nice little snack bar that requires zero oven-turning-on-ness, good-for-you ingredients, and a simple food processor...

It's summer, aka it's hot. We like healthy things. And there's a food processor in the pantry.

Sounds good to me. 

Let's get going.

First of all, a few deets: These bars are not "Reese's Peanut Butter Cup" copy cats. Nor do they want to be. They just want to be themselves. And they are totally delicious as themselves. Also, they are also just sweet enough and just rich enough - consider it a perfect balance of goodness. The bottom chocolate layer may seem familiar to you because it is almost identical to the Raw Cacao Truffles from a few weeks back. The ratio of ingredients is a little different from the truffles but is similarly rich and chewy. The middle layer is a scrumptious oat and peanut butter mixture and it's all topped with a creamy chocolate ganache.

Told you it sounded good.

But wait! There's more! These bars are made with all-natural, healthy ingredients... including the sweeteners. Win, win, win.

Okay, now let's get going.

Notes: I use this high-quality expeller-pressed coconut oil because it has no trace of coconut taste or scent, as does virgin coconut oil. In a bar like this, I prefer the chocolate and peanut-butter flavors to shine, and virgin coconut oil would bring another subtle flavor into the mix. 

** Update: I've been playing around with this recipe a little more and have discovered that I like to add more hemp and chia seeds. Here's what I've been doing: 1/2 cup hemp + 1/2 cup chia ground in a spice grinder (to get it all very finely ground). Add this to the oats after they've been processed in the food processor. This hemp+chia mixture substitutes for 1/2 cup of the walnuts, so decrease the total amount of walnuts to 1 cup.

Adapted from Nouveau Raw
Raw Chocolate Peanut-Butter Bars

bottom chocolate layer
1 1/2 cups walnuts (preferably soaked and dehydrated)
1 1/2 cups oats
1/4 cup hemp seeds
1 tablespoon chia seeds
2/3 cup raw cacao (or unsweetened cocoa)
1/4 teaspoon sea salt
10-16 Medjool dates, pitted
2 teaspoons vanilla
1-2 tablespoons water (if needed)

Place all ingredients in a food processor except the dates, vanilla, and water. Blend on high until everything is finely ground, a minute or two.

Add the vanilla to the food processor, then drop the dates in one at a time through the feed tube of the processor while it is running. You should end up with a mixture that appears as cake-like crumbs, but when pressed will easily stick together. If the mixture does not hold together well, add a few more dates or a couple drops of water.

Press the mixture evenly into an 8x8 baking pan with your hand. Place the pan in the freezer while you make the peanut-butter layer.

middle peanut-butter layer
1 1/3 cups oats
1/2 teaspoon sea salt
2/3 cup natural peanut-butter
1/3 cup raw honey
2 tablespoons expeller-pressed coconut oil, melted
1 teaspoon vanilla

Place oats in the food processor with the salt. Process until it becomes a fine powder.

Add the remaining ingredients and blend until well mixed. You may need to stop the processor a few times and scrape the sides with a rubber spatula to make sure the dough thorougly mixes.

Remove the pan of bars from the freezer. Place the peanut-butter mixture on top and press firmly with your hand to create an even layer. Return the pan to the freezer while you make the ganache topping.

ganache topping
6 tablespoons raw honey (or light agave nectar)
1/2 cup raw cacao (or unsweetened cocoa)
1/4 cup expeller-pressed coconut oil, melted
1/8 teaspoon sea salt

Place all ingredients in a blender and process for a few seconds. Stop to scrape the sides with a rubber spatula, then continue to blend until smooth.

Remove the pan of bars from the freezer. Pour the ganache over the top and spread evenly. Cover the bars and chill in the refridgerator until ready to serve.

Yield: about 16 bars, depending on how large or small you cut them
This post shared on The Nourishing Gourmet and Beyond the Peel

Raw Cacao Hemp Truffles

Jun 16, 2012


Brooke's 12 reasons to rejoice as of late:

1. I planted my very first little herb garden. Eeek! So cute. I'm slowly learning how to take care of my little plants. Last night I noticed all but one (apparently oregano is pretty hearty) were completely wilted... Oops. I promptly watered them and this morning they've perked right back up. The herbs are now on a strict every-other-day watering schedule. Cross your fingers.

2. Springtime is glorious. I can't get enough of it. 

3. One of my best friends from high school is having her first baby in just a few weeks! I am honestly going to burst with excitement for her. 

4. Speaking of cute bellies and babies in them, another of my best friends is also expecting her second little one this fall! Her first is a handsome boy. I just love that my friends are having babies because then I get to hold them... Sigh. Favorite thing in this world.

5. My brain has adapted well to typing with precisely nine fingers. While cutting some things for school with one of those huge cutter things, I, um, well, chopped the end of my left index finger off. I know. Not a pretty thought. I will spare you the pictures of the injured digit. It's healing well... Enough said?

6. Four days from now my cousin, Nathaniel, is leaving for a two-year church mission to Denmark. He is seriously going to be an incredible missionary and I am so happy for him. 

7. My almost-eight-year-old brother and I had a little date night last night. We went "scootering" and he taught me how to jump with my scooter. Yes, the boy's got skillz. We also explored the so-called forest at the end of our street and found a little stream with some cute snails. We played for a while in the dirt and then headed home for ice cream sundaes complete with fresh cherries on top and a classic movie, Peter Pan. Love date nights with my little brother!

8. Summer break is two weeks away! That said, there is a major downside to this fact. I am really, really going to miss my sweet 4th grade students.

9. I am signing up for watercolor classes and I CAN'T WAIT! 

10. This summer I will be living vicariously through pictures and stories of my sisters' world-wide, awesome adventures. Sister #3 is in Peru as I type, and sister #2 is going to Ghana in a week. I'm so excited for them! And also extremely jealous, obviously. Growing up and having a real career is so hard... Wah, wah, wah.

11. I am actually updating my blog.

12. And it includes chocolate.

Oh my goodness. These little chocolate truffles are so awesome. Like, so. They are completely delicious and are super, duper, ooper healthy. Go make them now. And then also later, because you'll want to.

Notes: If you are interested in knowing the amazing health benefits packed in these little chocolate bites, head on over to Sarah Britton's post here. She explains the great benefits of raw cacao, walnuts, and dates. You can use either chia or hemp seeds in this recipe. Both are delicious and wonderfully good for you. To learn about chia seeds, which are also amazingly packed with nutrition, check out this page. And for some info on hemp, see here.  Enjoy!

Originally inspired by The Raw Brownie at My New Roots
Raw Cacao Hemp Truffles

1/2 cup walnuts
1/2 cup oats
1/4 cup hemp seeds
2 teaspoons chia seeds
1/4 cup raw cacao
1/4 teaspoon sea salt
6 to 8 Medjool dates, pitted

Place all ingredients in a food processor except the dates. Blend on high until everything is finely ground, a minute or two.

Add the dates one at a time through the feed tube of the processor while it is running. You should end up with a mixture that appears as cake-like crumbs, but when pressed will easily stick together. If the mixture does not hold together well, add more dates or a few drops of water.

Scoop out tablespoon-sized portions of the dough and gently roll into balls. Dust with a little cacao, if desired.

Store truffles in a sealed containter in the fridge.

Yield: 12-14 small truffles
This post shared on The Nourishing Gourmet

Brown Butter Hazelnut Marble Cake

Mar 4, 2012


Hello there! Things have been a bit busy around here (hence the lacking posts lately). But work has gotten back to normal (at least for the next two-ish days...) and the sun has finally decided it's a good idea to stay a while longer each day. It's rather tricky trying to cook and take photos all in a matter of 1.4892 hours after returning from work. So thank you, Mr. Sun

By the way! It's now March. Which means... Spring is that much closer. Yay!

Okay, I'm just rambling now. On to cake, shall we?

Have I yet mentioned the gloriousness of browned butter? I don't believe I have... Well, in case you haven't discovered it yet, I now tell you that browned butter is liquid gold. All sorts of amazing things start to happen when you simply leave the butter in the pan on the stove for a minute or two past its initial meltation. (Yes, I made that word up. I think it's a pretty useful one.)

Also, hello. Roasted hazelnuts are glorious. Any nut that's roasted takes on such a more complex, deep, nutty flavor. Simply fantastic.

And finally, there's really no need to mention the gloriousness of chocolate. That's a given.

What I'm trying to say here is this: That when you combine all of these glorious things into one large bundt pan, well, what do you expect? Glorious things happen. This is absolutely one of my very favorite cakes. Probably in the top three. Or two. It was inspired by a cake I found a couple of years ago and has morphed into this lovely you see today. I've tweeked almost all the ingredients - adding more nuts and chocolate, browning the butter, playing with the sweetener and flour combinations, increasing the overall batter amount, practicing my batter-swirling skills - all very important things to master, especially in the name of Brown Butter Hazelnut Marble Cake. 

I hope you enjoy this cake as much as I do. It's a beautiful every-day cake, as well as a sophisticated celebration cake. I make it whenever the fancy strikes. So basically daily. (Well... not really. That would be a little much.) It's a very fun cake to put together. There are several steps, but really, it is a pleasure to create.

Happy baking!

(Is the Mr. Sun song stuck in anyone else's head right now?)

Notes: If you want, you can use exclusively all-purpose flour in the cake. I enjoy the combination of a bit of whole grain, but the cake is quite forgiving either way. Also, I've tried this without the chocolate swirl, just not melting any chocolate for half of the batter, and it was also nice. But you know, I believe there can never be too much chocolate, so I prefer it with the swirl. On a similar note, the ganache can be totally optional. The cake is so rich and flavorful on its own that it really doesn't need the ganache. (I can't believe I just said that. No such thing as too much chocolate pour moi.) Your call.

Heavily adapted from Dorie Greenspan's Mocha-Walnut Marbled Cake in Baking: From My Home to Yours


Mississippi Mud Pie

Dec 14, 2011


December 14, 2011
Dear Fellow Chocolate Lovers of the World,

      I hope this letter finds you in good health and joyous spirits. Since our last correspondence, I have made a monumental discovery. Dear friends, I have found our Holy Grail of all things good, beautiful, and, most important, chocolate. Yes, indeed. This is it!

      Behold - Mississippi Mud Pie.


      Versions of Mississippi Mud Pie vary wildly in interpretation and mean many things to many people. Most are encased in some type of cookie crust, though, but whether that be chocolate, graham, or vanilla is up for personal interpretation. To some, Mississippi mud pie includes bourbon and nuts. To others, Mississippi Mud Pie is not really Mississippi Mud Pie without a thick layer of coffee ice cream hiding below a cloud of marshmallows. Despite these differences, the signature of a true Mississippi Mud Pie is that it is chocolate-based in one way or another.

      This version just happens to be chocolate-based in all ways. Or in other words, this is the best one. Ever.

      What makes this Mississippi Mud Pie the best one ever, you ask? Ah, a good question to challenge a bold statement on my part. But I assure you, it won't take much convincing for you to realize the truth of my statement. Now, where do I begin? I supposed the crust would be an appropriate place to start. Encasing the entire pie is a tender, pure black cookie-crumbled crust. It is made from real, homemade chocolate wafers which are then pulverized to a fine crumb and finally mixed with a bit of butter to hold it all together. After the crust has visited the oven for a few minutes, a thick (almost) flourless cake batter is poured in. This layer bakes up into a dense, almost gooey confection; imagine a cross between an intensely chocolaty brownie and a light soufflĂ©. Yeah, it's good. As we continuing moving up the layers we next find ourselves a lovely layer of dark chocolate pudding. Rich with whole milk and a generous bunch of egg yolks, this stuff is creamy, smooth, and purely delightful. And finally, please tell me, what dessert is complete without a great big dollop of lightly sweetened whipped cream on top? None. You are right. Sprinkle on a few pinches of chocolate shavings to make the whole thing look nice and pretty and there you have yourself the best Mississippi Mud Pie. Ever.

      So, my dear chocolate appreciators, make one of these babies for yourselves and you will see. You will see that I have indeed found our Holy Grail.

      Hello, chocolate.

      We love you.

      Forever your all-things-good-beautiful-and-chocolate-loving friend,
      Brooke


Notes: First off, this cake is intense. Intense in every sense of the word, pretty much. That said, it is really amazing. This Mud Pie is worth every single minute you put into it. And, of course, it is so much fun to make! I know it is a long recipe; it does have a lot of steps. The first time I made this cake it took me... all day. I've made it numerous times since then and have found a few short cuts (which I've tried to include below) so it only takes me a couple hours total to whip up. A word of advice: Start the cake in the morning because each of the steps requires a bit of chilling before moving on with the rest of the recipe. So... Also, read the whole thing before you get started, as is always the practice of a good chef.

This recipe is based off the Mississippi Mud Pie in Matt Lewis and Renato Poliafito's Baked Explorations. Their version includes each of the components I include in mine: an (almost) flourless cake baked in a chocolate cookie crust, covered with a rich chocolate pudding and a thick layer of whipped cream. My main tweaks to the original Matt and Renato created are that I make my own chocolate wafer cookies for the crust and I use a recipe from Alice Medrich for the (almost) flourless cake. To save yourself one step in this process, you can certainly use 16 ounces of chocolate wafer cookies instead of baking your own. You will still pulverize the cookies to a fine crumb and mix the crumbs with the 5 tablespoons of melted butter.

You will love.

Chocolate cookie wafers and cake adapted from Bittersweet, by Alice Medrich
Pudding and assembly adapted from Baked Explorations, by Matt Lewis and Renato Poliafito 


Mississippi Mud Pie

chocolate cookie crust

1 cup whole wheat pastry flour
1/2 cup + 1 tablespoon unsweetened cocoa
1/4 teaspoon baking soda
1/4 teaspoon fine grain salt
4 tablespoons unsalted butter, at room temperature
1/4 cup light brown sugar
1/3 tablespoons granulated sugar
1 teaspoon vanilla
3 tablespoons whole milk

4 tablespoons unsalted butter, melted

Preheat oven to 350°F. Place a piece of parchment on a baking sheet. Set aside. Line the bottom of a 10-inch springform pan with a parchment round, then lightly butter the pan and parchment. Set aside.

In a medium bowl, whisk together the flour, cocoa, baking soda, and salt. Set aside.

In a medium bowl, beat the softened butter and sugars until light and creamy. Add the vanilla and milk and mix until well combined. (Mixture may look curdled.) On low speed, add the flour mixture just until incorporated.

Use a small cookie scoop to drop little mounds of dough onto the parchment-lined baking sheet. Using lightly floured hands, press the mounds of dough into 1/4-inch flat disks. (Don’t worry about making these too neat - you’ll be grinding them up shortly.)

Bake the cookies for 10 minutes, until the cookies puff and then settle slightly when done. Remove cookies from the baking sheet and let cool to room temperature. (A 10 minute pop in the freezer works well to speed this process up.)

Place cooled cookies in a food processor. Process until cookies are evenly and finely crushed. Pour the melted butter on top of the crushed cookies and pulse until well mixed. Turn the crumb mixture into the prepared pan and press it into the bottom and up the sides, leaving about 1/2-inch between the top of the crust and the top of the pan. Use the bottom and sides of a cup to get an even, firm layer of crust on the bottom and sides. Place the pan in the freezer and let the crust set for about 10 minutes

Bake the crust until dry to the touch, about 10 minutes. Transfer to a wire rack and let cool.

cake
3 ounces bittersweet chocolate, finely chopped
1/2 cup unsweetened cocoa, sifted
1 cup sugar, divided
1/2 cup boiling water
2 eggs, separated into 2 yolk and 2 whites
1 tablespoon vanilla
1/4 teaspoon cream of tartar
1/4 cup whole wheat pastry flour

Increase oven temperature to 350°F.

In a large bowl, combine the chocolate, cocoa, and 3/4 cup of the sugar. Pour in the boiling water and whisk until the mixture is smooth and the chocolate is completely melted. Whisk in the egg yolks and vanilla, then whisk in the flour. Set aside.

Using a stand mixer fitted with the whisk attachment, combine the egg whites and cream of tartar. Beat until soft peaks form. Gradually sprinkle in the remaining 1/4 cup sugar and beat until stiff but not dry.

Gently fold about a quarter of the egg whites into the chocolate mixture to lighten it. Fold in the remaining egg whites until they are almost completely combined, taking care to not overmix.

Scrape the batter into the cooled crust and level the top if necessary. Bake for about 20 minutes, until just set and a toothpick inserted into the center comes out with a few moist crumbs clinging to it. The cake will develop a bit of a crust on top. Cool on a wire rack for 30 minutes, then transfer to the refrigerator to chill for at least 3 hours. (The cake may sink and crack a little like a soufflé as it cools.)

pudding
3/4 cup sugar
1/2 cup unsweetened cocoa, sifted
1/4 cup cornstarch
1/4 teaspoon fine grain salt
4 egg yolks
2 1/2 cups whole milk
3 tablespoons unsalted butter
2 teaspoons vanilla
3 ounces bittersweet chocolate, finely chopped

As the cake is baking in the crust, prepare the pudding. In a large bowl, whisk together the milk and egg yolks until completely combined. Set aside.

Set a medium saucepan on the stove but do not turn the heat on yet. Add to the saucepan the sugar, cocoa, cornstarch, and salt. Slowly whisk in the milk and egg mixture, starting with just about a 1/2 cup of the milk mixture. Whisk this until it is smooth, then add the rest of the milk mixture in 1/2 cup or so increments until it is all mixed in. The pudding should be very smooth and free of any little lumps.

Turn on the heat and bring the mixture to a boil, whisking constantly to prevent the pudding from burning to the bottom of the pan. Boil for 30 seconds, then transfer it to a large bowl. Add the butter, vanilla, and chocolate. Whisk until combined and then for a few more minutes to cool the mixture slightly. Let the pudding stand for 15 minutes at room temperature then cover with plastic wrap and chill for at least 3 hours.

whipped cream
1 1/3 cups well-chilled heavy cream
1/4 teaspoon vanilla
2 tablespoons powdered sugar, sifted

When all components of the cake are chilled and you are ready to assemble the cake, pour the cream into a bowl and beat with a whisk for about 1 minute or until soft peaks form. Sprinkle the sugar in and add the vanilla. Continue whisking vigorously until stiff peaks form.

to assemble
Stir the pudding to loosen it, then pour it on top of the cake, making sure to stay inside the cookie crust border. Use a spatula to spread the pudding evenly. Return the cake to the refrigerator for at least 30 minutes.

Spread the whipped cream across the pudding layer, all the way to the sides. Sprinkle with chocolate shavings, if desired. Unmold the cake and serve
immediately.

The cake can be kept, covered, in the refrigerator for up to 3 days.

Yield: One 10-inch round cake

Chocolate Chip Cookies

May 31, 2011


Okay. So let's avoid all the flowery ho-hum and get right down to business, people. These cookies are A-MAZ-ING. They are so good, in fact, that I just might call them The Greatest Chocolate Chip Cookies Ever to be Invented by Man. Actually, I just decided - I will call them that. Here, before your lucky little eyes, you see The Greatest Chocolate Chip Cookies Ever to be Invented by Man. I know that's saying a lot. But seriously, you have to try these.


Everyone's got their favorite. These are mine.

By far.


Here is why:

1. They're BIG.
2. They're crispy and a little crunchy on the edges.
3. They're gooey and chewy in the middle.
4. They're mostly about cookie goodness - not so much about tooth-aching sweet.
5. You put salt on top, which sounds weird, but is so wonderful.
6. They have an amazing complex, caramelized, sophisticated flavor. Really.
7. They have lots and lots of delicious chocolate pieces inside them. Each bite is like a fantastic chocolate circus in your mouth. Amazing, right? I know, tell me about it.
8. And... Okay, I just love them. I could eat them all day long. And all night long, too. (If I could eat while sleeping, that is.)


So make them. (And please read the notes below. They are very important.)

Happy cookie making, cookie dough sneaking, and cookie nirvana eating.

Notes: I think there are three things that this recipe really has going for it: 1) The combination of bread and cake flours. The texture of these cookies is awesome. Most cake flours are bleached, which means lots of processing and chemicals. I use King Arthur's brand of cake flour, which is unbleached. 2) Let the dough rest for at least 24 hours, as the recipe states. It's amazing the transformation the flavors take on. So worth it. The resting allows the liquids in the dough to be absorbed, giving you a firmer dough that bakes up into thick, chewy, caramel-y, sophisticated cookies. And, 3) Please use some really good-quality chocolate here. I love Ghiradelli's 60% cacao bittersweet baking chips. They're find-able, affordable, and de-lish. I use about two cups of the chips as they are, and then I roughly chop the remaining 1/2 cup to distribute even more chocolate in each cookie. If you want to splurge, (oh man!) go for these. Or these. Oh, annnd also, sometimes I like to add about 2 cups of chopped, toasted walnuts or pecans. Your choice.

Adapted from The New York Times, courtesy of this gentleman. Let's just call him the Chocolate Genius, shall we?


This post linked to Real Food Wednesdays and Sweet as Sugar

Rosemary Olive Oil Cake

May 20, 2011


Upon first seeing this recipe, I thought it sounded a little... strange. Rosemary is a savory ingredient and chocolate is not, though I found the idea of combining the two intriguing. Sometimes opposites compliment each other, as this cake clearly demonstrates. I've found that in cooking and baking it's often these kind of unexpected pairings that bring complexity and intrigue to the final product. Such trials of seemingly-unusual flavor pairings make spending time in the kitchen so exciting and fun for me. Especially when the results promise such a stunning treat.

This cake is one of my absolute favorites. Rosemary, chocolate, and olive oil create a memorable and interesting-in-a-very-good-way cake that is completely delightful. Each bite is flecked with rosemary shards and chocolate pieces. The olive oil brings a subtle fruitiness and keeps the cake extremely moist. Although the rosemary is not overpowering, it adds a subtle complexity to the cake that is most delightful.

So here I present my idea of a perfect snack cake, if there ever was one. I really hope you'll give it a try. You might be surprised just how much you love this cake.

Notes: I have baked this cake is several different pans. My latest favorite pan to use is a new, small, 6-cup bundt (as shown above). You can also bake it in a 9x5 loaf pan, a 9-inch cake pan, or a 9-inch flauted tart pan. The sugar sprinkled over the top of the cake adds a wonderful crunch. I left it off in the picture above because I planned on inverting the cake, but then decided that I liked the rustic look of the 'underside' and made that the top. And finally, if you prefer, you may substitute all-purpose flour for the spelt and whole-wheat.

Adapted from Good to the Grain

Coconut Cake with Chocolate Chunks & Coconut Drizzle

May 2, 2011


I was a Girl Scout back in the day. You know, the signature green and brown vests with badges, camping trips, service projects, plenty of silly songs, crafts, and games... (the last three being essential life-saving skills, mind you). Wait, I'm forgetting something, you say? Oh yes. That's right. Girl Scout cookies. Silly me, to forget. I don't know how many boxes of cookies I sold during my scouting days, but it was a lot. I remember the Thin Mint cookies were always the most popular. My personal favorites were the Samoa cookies, though. Chewy, chocolaty, and nutty from the toasted coconut. A glass of milk was a must with these little treats - dunking was certainly necessary. Selling boxes upon boxes of the various signature cookies was always an exciting part of being a Girl Scout.

I was immediately reminded of Girl Scout Samoas when taking my first bite of this cake. Although there is no caramel in it, as there is in the cookies, this cake is very moist and has a perfectly subtle coconut flavor. The chocolate chunks are rich and the coconut on top is crunchy and barely sweet. The cake is best served with a tall glass of milk. (Though dunking is not necessarily suggested...)

Notes: I have made this cake several times, playing around with different ratios of flour types, and have found the following combination of whole-wheat pastry and all-purpose flours to provide the most appealing crumb. You may certainly use exclusively all-purpose, if you wish. Also, I love this cake best when made with coconut oil because it lends an extra kick of creamy coconut flavor. If you don't have coconut oil on hand, butter also makes a rich and delicious cake. Coconut milk is sold in cans, typically near the Asian foods at the grocery. Be sure to not use "light" coconut milk - it is too watery for the cake. You can play around a little with the flavorings for fun, if you'd like. I think next time I make this I'm going to try it by leaving out the orange zest, and instead of vanilla, use almond extract. Have fun and enjoy!

Adapted from Bon Appetit, also found here

Tiger Cake

Apr 21, 2011


This is a really fun cake. Not only is it called Tiger Cake (who would turn down a cake with that kind of awesome name!?), but as soon as you cut a slice, the cake looks like you spent forever making the beautiful swirls inside.

Secret: you did not. You did not spend forever making the beautiful swirls inside - because it's magic.

Or it's just that the batter marbles itself as the leaveners begin reacting from the heat of the oven.

One of the two.

Anyway, this cake is also really fun because it is made with olive oil and pinch of white pepper. Sound strange? I know. Stay with me. The flavors are very subtle and so delicious. The pepper does its work behind the scenes - it doesn't stand out as a dominant flavor at all. The job of the pepper is to accentuate the olive oil flavor, which it does just beautifully.

I was a bit hesitant before trying this cake - pepper in cake? Really? Pepper. Hesitation finally set aside, I decided to trust Alice Medrich's award-winning reputation.

And it honestly works. Somehow.

Maybe it's magic, after all.

Notes: I decreased the amount of sugar in the original cake from 2 cups to 1 1/2 cups because I prefer my desserts a little less sweet. If you like your cakes on the sweeter side, I would leave the sugar at 2 cups. Also, Alice notes that natural cocoa is a must in this recipe because Dutch-process adds an unpleasant taste since it reacts with the leavening and olive oil in the cake.

Adapted from Bittersweet

Cream Cheese Brownies

Apr 14, 2011


Brownies. Cream cheese. Does it get any better than this? Two of my favorite things combined into one little dish makes for a rich and intense dessert.


I've tried other recipes for cream cheese brownies, but none have quite hit the spot for me. Not these. These brownies have the perfect ratio of cream cheese to chocolate - a very important element in this dessert. Most recipes call for half of the cream cheese that these call for. For me, the ideal cream cheese brownie should be a rich, fudgy brownie with a swirl of cream cheese filling in every bite. These are the winners.

Notes: I've included my regular substitutions for the all-purpose flour and traditional white sugar called for in the original recipe below. Feel free to use what you have on hand.

Adapted from The New Best Recipe


This post linked to Sweet as Sugar
Related Posts Plugin for WordPress, Blogger...

The Flour Sack All rights reserved © Blog Milk Powered by Blogger