Carrot Oatmeal Cookies

Nov 23, 2012


Cookies, cookies, cookies. They're just about everywhere this time of year. 

Unfortunately all those cookies can mean refined sugar and refined flour over-load. These cookies are a nice break from all of that because they actually provide a hefty dose of nutrients. They're made with only wholesome ingredients and don't leave you feeling that yucky inevitable sugar crash associated with refined foods.

So let's take a look... We've got whole grain flour and oats; fresh carrots; healthy fats from the coconut oil, flaked coconut, and pecans; good-for-you-tasty spices, and some natural sweetness from maple syrup. Yum. I just love healthy snacks.

I've been making these cookies for a couple of years now and they've remained a family favorite to this day. We usually have the ingredients on hand and they're quick to throw together. No waiting for ingredients to come to room temperature or creaming involved - just two bowls, a whisk and a spoon. 

Convinced yet? You should be.

Notes: These cookies are easily adaptable. For example, you might experiment with different nuts, oils, flours, or even adding a little lemon zest. In the cookies pictured, I didn't add the optional raisins. Sometimes I throw them in, sometimes not. They're a great addition if you like baked goods with raisins. Enjoy!

Adapted from 101 Cookbooks
Carrot Oatmeal Cookies

1 1/3 cups whole-wheat pastry flour (or spelt flour)
1 teaspoon baking powder
1/2 teaspoon fine sea salt
1 teaspoon cinnamon
1/4 teaspoon freshly ground nutmeg

1 cup rolled oats
2/3 cups chopped pecans
1/3 cup unsweetened coconut
1 cup finely grated carrot
1/3 cup raisins or currants (optional)

1/2 cup pure maple syrup
1/2 cup virgin coconut oil, melted
1 tablespoon freshly grated ginger

Preheat oven to 350°F.

Line two baking sheets with parchment and set aside.

In a large bowl, whisk together the flour, baking powder, salt, cinnamon, and nutmeg. Add the oats, pecans, coconut, and carrot. Stir to combine.

In a separate smaller bowl, whisk together the maple syrup, melted coconut oil, and ginger. Add the maple mixture to the dry ingredients and gently stir just until combined.

Drop cookies onto prepared baking sheets, one tablespoonful at a time. Bake for 10-12 minutes, until cookies are set and slightly golden.

Yield: about 32 small cookies

Pumpkin & Feta Muffins

Nov 6, 2012


Now that our garden is literally overflowing with pumpkins, we're taking advantage of the bounty and trying to use as many as we can. Pumpkin is making its way into lots of things lately: bread, more bread, tarts (like this one), gnocchi, on dinner plates simply roasted with butter and salt, and now in these tasty little muffins.

I've had my eye on these guys for a while. I quite enjoy savory baked goods and these muffins do not disappoint. You'll notice a few interesting ingredients but I assure you that they are wonderful complimenting flavors. The squash lends a hint of sweetness, the feta a bit of salt and creaminess; the mustard is not overpowering, but rather hints in the background, as does the black pepper and Parmesan. Really, these muffins are a great way to use up a little more of that wonderful winter squash. I can imagine they'd make a perfect addition to a Thanksgiving meal, too! I hope you enjoy...


Notes: The first time I made these muffins I could tell the had a lot going for them... Unique, savory, wonderful flavor combinations, yada yada. BUT the only thing was that they were quite dry. Interestingly enough, the original recipe doesn't call for a speck of oil. Not one drop. I'm not sure why this is, but on my second batch I decided olive oil was definitely making its way into the mix. Cha-ching! That was all these little muffins needed. The olive oil adds the perfect amount of moisture and compliments the other earthy/savory flavors perfectly. I also increased the amount of pumpkin from 2 cups to 3, because pumpkin is delicious. Two more things: As noted in the recipe below, butternut squash may be used in place of the pumpkin. And, as usual, feel free to use exclusively all-purpose flour in place of the whole-wheat pastry, if you prefer.

Adapted from Martha Goes Green, as seen on 101 Cookbooks
Pumpkin & Feta Muffins

3 cups cubed pumpkin (or butternut squash), cut into 1/2-inch cubes
extra-virgin olive oil
salt and pepper to taste

1 1/4 cups whole-wheat pastry flour (or spelt flour)
3/4 cup all-purpose flour
4 teaspoons baking powder
3/4 teaspoon fine-grain sea salt
1/4 teaspoon freshly ground black pepper

2 eggs, lightly beaten
1 cup whole milk
1/2 cup extra-virgin olive oil
2 teaspoons whole-grain mustard
1/2 cup sunflower seeds kernels
3/4 cup freshly grated Parmesan
2/3 cup crumbled feta
1 large handful spinach, chopped
2 tablespoons chopped parsley (or cilantro)

Preheat oven to 400°F. Generously grease a 12-hole muffin pan with olive oil and set aside. (I always have a little bit of batter left after filling the 12 muffin holes, so you can choose to also grease 2 additional muffin holes in another pan, or grease a little loaf pan. I do the latter.)

Place the cubed squash on a baking sheet. Drizzle with a little olive oil and add a few sprinkles of salt and pepper. Toss to evenly coat the squash and bake for 20-25 minutes, or until cooked through. Set aside to cool.

In a large bowl, whisk together the flours, baking powder, salt, and pepper. Set aside.

In a medium bowl, whisk together the eggs, milk, olive oil, and mustard. Stir in the sunflower seed kernels, Parmesan, and 3/4 of the feta. Add 3/4 of the roasted squash cubes, then gently fold in the spinach and parsley.

Add the wet ingredients to the dry and gently fold just until the batter comes together; be careful not to over mix. Spoon the mixture into the prepared pan(s), filling each muffin hole 3/4 full. Top each muffin with a bit of the remaining squash and feta. Bake for 15-20 minutes or until the tops and sides of the muffins are golden, and the muffins have set up completely. Let the muffins cool for a few minutes in the pan, then turn them out onto a cooling rack.

Yield: 12-14 muffins

Quintuple Chocolate Brownies

Oct 23, 2012


quin·tu·ple  [kwin-tuhp-uhl]   
adjective
1. fivefold; consisting of five parts.

Yes, I managed to put five different kinds of chocolate into one brownie. Why? Um.... Because chocolate is obviously the best food group ever invented. And also because brownies are obviously the best vehicle for consuming the aforementioned best food group. Obviously.

Let me explain...

Last spring my mom and I got to spend 10 days in England. We went in celebration of my graduation from college and it was one of the best trips ever. We had such a blast and loved every minute of our time there. It was wonderful to be back in the stunning country that we grew to love so dearly when we lived there years ago. It is our second home, you might say, and I daydream of it often.

While out in the country one day, we stopped at a little tea shop and had lovely lunch. After our yummy sandwiches were gone and the meal had been paid for, I stopped to oodle at the glass case full of delectable baked goodies. 

And then... She brought them out. From the back kitchen with a plate full of warm, deep, dark, eat-me-now-and-you-will-never-love-another-brownie-quite-like-me-again brownies she came. 

I just couldn't not. So I asked for one ("...without an edge, please."), paid for it in pounds, and walked out into the crisp England air. 

It has been since that very day, that very first nibble outside of Collington's Tea Shop on the  cobblestone street of Brampton, England, that I declared that I would recreate that exact brownie.

And now, over a year later, and... 20-ish (?!?) pans of brownies... Here they are. 


Oh my goodness. These are the most chocolatey brownies. (Remember the quintuple part?) They are so moist and rich. They are also perfectly thick, hefty, and not-too-gooey-but-still-gooey brownies you will ever meet. They are the brownies that remind you why the chocolate food group was ever invented in the first place.

A simple word of advice: I think the brownies are at their peak approximately 1.5 hours after being removed from the oven (but who am I kidding, they're insanely wonderful any time...) because then they've set up nicely, are still warm and oh-so-rich, and the milk and white chocolate chunks inside stay soft and melty.

Mmmm... Chocolate seriously doesn't get any better than this.

Go make yourself a batch of Quintuple Chocolate Brownies and you will never love another brownie quite like these again. 

Guaranteed.

Notes: First thing: Use really high-quality chocolate (I prefer Callebeaut or Scharffen Berger). It definitely makes a difference. Second: Of course I had to create these brownies with whole-wheat flour, and yes, it works absolutely wonderfully here. I made a slight adjustment to the original quantity of flour because I added the whole-wheat, so if you are using all-purpose, increase the flour to 5 ounces. Third: I also found that, because of my addition of white and milk chocolate chunks, these are best with  slightly less sugar in the batter than the original recipe called for, so the recipe below reflects this adjustment as well (the original calls for 8 3/4 oz (1 1/4 cups) sugar). And one more thing: I bake these in a 7x7 baking pan so that they're even more thick, but an 8x8 also produces a hefty brownie just fine. Other than that... Enjoy your chocolate-loving hearts out!

Inspired by the brownies at Collington's Tea Shop in Brampton, England
Brownie base adapted from Cook's Illustrated's Chewy, Fudgy Triple Chocolate Brownies

Quintuple Chocolate Brownies

5 ounces bittersweet chocolate, roughly chopped
2 ounces unsweetened chocolate, roughly chopped
1/2 cup unsalted butter, cut into quarters
3 tablespoons cocoa

3 eggs, at room temperature
7 1/4 ounces (3/4 cup + 2 tablespoons) granulated sugar
2 teaspoons vanilla
1/2 teaspoon sea salt

4 ounces (1 cup) whole-wheat pastry flour
3 ounces high-quality white chocolate, cut into 1/4-1/2 in. pieces
3 ounces high-quality milk chocolate, cut into 1/4-1/2 in. pieces

Heat oven to 350°F. Butter a 7x7 in. (or 8x8 in.) baking dish, then line the dish with parchment so that there is an inch or two of extra parchment hanging over the sides (to help you lift the brownies out). Butter the parchment. Set aside.

Place a medium glass bowl over a pan of almost-simmering water. Melt bittersweet and
unsweetened chocolates with the butter, stirring occasionally until the mixture is smooth. Whisk in cocoa until smooth. Set aside to cool slightly.

In a large bowl, whisk together the eggs, sugar, vanilla, and salt until combined, about 15 seconds. Whisk warm chocolate mixture into egg mixture, then stir in flour with a rubber spatula until just combined. Gently fold in white and milk chocolate pieces until evenly distributed throughout the batter.

Pour batter into prepared pan. Spread batter into the corners and level the surface with the rubber spatula. Bake brownies until slightly puffed and a toothpick inserted in the center comes out with a small amount of sticky crumbs clinging to it, about 33-38 minutes.

Allow brownies to cool completely on a wire rack to room temperature, about 2 hours. Remove brownies from pan using parchment overhang. Cut into 9 or 12 squares and serve.

Yield: 9-12 brownies, depending on the size you cut them

Spiced Honey Pumpkin Bread

Oct 6, 2012


Mission: To create a pumpkin bread that is just-my-kind-of-perfect pumpkin bread. 

Requirements as follows: 

- obviously pumpkin-y
- whole grain
- naturally and lightly sweetened
- plenty of spice (especially cinnamon)
- very moist
- a strong, tender crumb
- crunchy top crust

Mission: Accomplished. Yessssssss.


Notes: This is a really great base recipe for pumpkin bread. You can certainly bake the batter in muffin tins or even double the recipe to bake in a bundt pan. I've included a three options for slightly different variations; one simply sprinkles a little sugar and some pumpkin seeds on top, another adds a cinnamon-oat streusel topping, and the last is a bittersweet chocolate chunk version. As for the sweetener, honey or maple syrup will do just fine. My reason for using honey (other than the excellent flavor and moisture it adds to the bread) is the fact that we have gallons of the stuff thanks to our busy bees out back. And as for the flour, I found a little white flour gave just enough structure to the bread. A substitution of spelt flour or even white flour may be replaced for the whole-wheat pastry flour.

A Flour Sack original
Spiced Honey Pumpkin Bread

1 1/4 cups whole-wheat pastry flour (or spelt flour)
1/2 cup all-purpose flour
1 teaspoon baking powder
1/2 teaspoon baking soda
3/4 teaspoon sea salt
1 tablespoon cinnamon
2 teaspoons freshly-ground nutmeg
1/4 teaspoon cloves
1/4 teaspoon ground ginger

1 1/4 cups pumpkin puree
1/2 cup extra-virgin olive oil (or melted coconut oil)
1/2 cup honey (or maple syrup)
2 eggs, room temperature

Preheat oven to 350°F. Grease a 8 1/2 x 5-inch loaf pan with olive oil. Set aside.
In a medium bowl, whisk together the flours, baking powder, baking soda, salt, and spices. Set aside.

In a large bowl, whisk the pumpkin puree, olive oil, honey, and eggs until well-combined. Add flour mixture to pumpkin mixture and whisk for 10 seconds, just until the flour disappears and the batter is mostly smooth.


Pour batter into prepared pan. Sprinkle with desired toppings (see below) and bake for 40-45 minutes, until a toothpick inserted in the center of the bread comes out clean.

Let the bread sit in the pan for 10 minutes on a wire rack, then remove bread and finish cooling on the wire rack. Slice the bread once it has cooled for at least 1 hour.

Yield: one loaf

:: Variations ::

Crunchy Pepita Topping
Pour pumpkin bread batter into prepared pan. Sprinkle top with 2 tablespoons pepitas (pumpkin seeds), then 1 tablespoon granulated sugar. Bake as directed above.

Cinnamon-Oat Streusel Topping
In a small bowl, mix together 1/4 cup whole-wheat pastry flour, 1/4 cup rolled oats, 1 teaspoon cinnamon, 2 tablespoons granulated sugar, and a pinch of sea salt. To the mixture, add 4
tablespoons of chilled unsalted butter that has been cut into cubes. Rub the butter between your
fingers, breaking it into smaller bits. Continue rubbing until the mixture feels coarse like cornmeal, with some larger chunks of streusel as well. Add in 1/4 cup chopped pecans. Pour pumpkin bread batter into prepared pan. Sprinkle top with streusel. Bake as directed above.

Bittersweet Chocolate-Chunk
Fold 6 ounces of coarsely chopped bittersweet chocolate into batter after combining flour and pumpkin mixtures. Pour batter into prepared pan. Sprinkle top with an additional 2 ounces of coarsely chopped bittersweet chocolate, then 1 tablespoon granulated sugar. Bake as directed above.

This post shared on The Nourishing Gourmet and Beyond the Peel

Baked Pasta with Zucchini, Corn, Tomatoes, and Basil

Sep 22, 2012


As today is officially the first day of autumn, I thought we'd say farewell to summer with this great end-of-summer pasta. It uses lots of fresh garden veges, includes a bit of melty cheese, and reminds us just how great the summer produce is. 

Until next year, dear Summer!

P.S. I'm so excited, though. Autumn is my favorite (!!!) season. Bring on the pumpkins, crispy leaves, and corn mazes!

Notes: I've adjusted the proportions in this recipe from the original because 1) it didn't make enough for us, 2) we like tomatoes and garlic, and 3) we also like cheese. Mmmm....

Adapted from Williams-Sonoma 

This post shared on Beyond the Peel and The Nourishing Gourmet

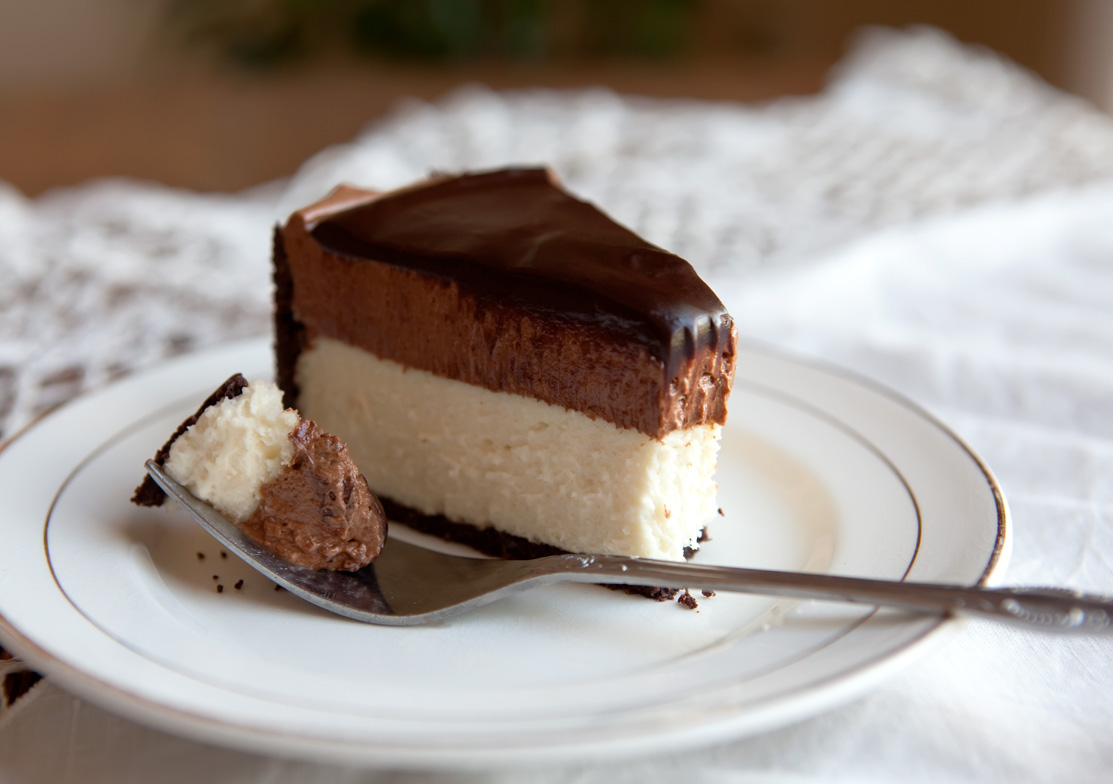
Chocolate Mousse Cheesecake

Sep 15, 2012


"This should be illegal. I mean, I should be arrested for eating this."

That's a direct quote from my mother, spoken yesterday at 8:42 a.m.

We consider this our new favorite dessert. 

Or breakfast, cause that's the way we roll sometimes. 

We haven't been arrested by the Incredibly-Dreamy-Cheesecake Police yet. And by Incredibly-Dreamy-Cheesecake Police I mean that the cheesecake is incredibly dreamy, not the police. I haven't seen them yet to make that judgement. 

The only judgement I have been able to make is that this cheesecake really is dreamy. It is decadent. It is smooth and silky with a slight crunch from the crust. Rich. Every layer compliments each of the others brilliantly. It is simple perfection. 

Yes, there are a lot of steps to making this cheesecake, but I guarantee it will be so worth it. 

... Even if the cheesecake police that come to arrest you aren't all that dreamy. At least the cheesecake you made was. ;)

Notes: Read through the entire recipe before beginning. I repeat: Read through the entire recipe before beginning! You'll need to plan a few things in advance, such as having softened butter and cream cheese around, time for the cheesecake to completely cool, etc.

Idea adapted from Mangio da Sola
Chocolate Cookie Crust adapted from Alice Medrich
French Mousse adapted from Tyler Florence
Creamy Cheesecake adapted from Dori Greenspan

Chocolate Mousse Cheesecake

bottom layer - chocolate cookie crust
1 cup whole-wheat pastry flour
1/2 cup + 1 tablespoon unsweetened cocoa
1/4 teaspoon baking soda
1/4 teaspoon salt
4 tablespoons unsalted butter, at room temperature
1/4 cup brown sugar
1/3 cup granulated sugar
1 teaspoon vanilla
4 tablespoons milk

3 tablespoons unsalted butter, melted

Preheat oven to 350°F. Place a piece of parchment on a baking sheet. Set aside. Line the bottom of a 9-inch springform pan with a parchment round, then lightly butter the pan and parchment. Set aside.

In a medium bowl, whisk together the flour, cocoa, baking soda, and salt. Set aside.

In a medium bowl, beat the softened butter and sugars until light and creamy. Add the vanilla and milk and mix until well combined. (Mixture may look curdled.) On low speed, add the flour mixture just until incorporated.

Use a small cookie scoop to drop little mounds of dough onto the parchment-lined baking sheet. Using lightly floured hands, press the mounds of dough into 1/4-inch flat disks. (Don’t worry about making these too neat - you’ll be grinding them up shortly.) Bake the cookies for 10 minutes, until the cookies puff and then settle slightly when done. Remove cookies from the baking sheet and let cool to room temperature.

Place cooled cookies in a food processor. Process until cookies are evenly and finely crushed. Pour the melted butter on top of the crushed cookies and pulse until well mixed. Dump the cookie mixture into the parchment-lined springform pan. Press the mixture evenly up the sides of the pan, then evenly over the bottom.

Wrap the bottom of the springform pan in a double layer of aluminum foil. Place the crust in the freezer for 10 minutes. Remove the crust from the freezer and bake for 10 minutes, until set and dry to the touch. Let the crust cool on a wire rack while you make the cheesecake.

layer 2 - creamy cheesecake
1 pound (2 8-ounce packages) cream cheese, at room temperature
2/3 cup granulated sugar
1/4 teaspoon salt
1 teaspoon vanilla
2 eggs, at room temperature
2/3 cup heavy cream

Decrease oven temperature to 325°F. Put a pot of water on the stove top boil.

Working in a stand mixer fitted with the paddle attachment, beat the cream cheese at medium speed until it is very soft and smooth, about 4 minutes. Add the sugar and salt, and continue to beat at medium speed for another 4 minutes or so, until the cream cheese is light. Beat in the vanilla. Add the eggs one by one, beating for a full minute after each addition to yield a well-aerated batter. Reduce the mixer to low speed and mix in the heavy cream.

Give the batter a few stirs with a rubber spatula to make sure that nothing has been left
unmixed at the bottom of the bowl. Scrape the batter into the cooled cookie crust. The batter should fill about half way up the pan. Place the springform pan in a roasting pan large enough to give at least a 1-inch space between the cheesecake and the roasting pan. Place in the center of the oven and then carefully pour the boiling water into the roasting pan to come halfway up the sides of the springform pan.

Bake the cheesecake for about 45 minutes, at which point the top will be ever so slightly browned and the cheesecake will have puffed a little. The best way to tell if your cheesecake is done is to insert a thermometer into the center; it should read 150°F.  Remove cheesecake from from the roaster pan - be careful of the hot water - and remove the foil. Place cheesecake on a wire rack. Prop a large bowl over the cheesecake, leaving a 1-inch crack to let the cheesecake cool slowly.

When the cake is cool, cove with plastic wrap and chill in the refrigerator for at least 4 hours, or overnight.

*** Make the mousse once the cheesecake has cooled.***

layer 3 - french chocolate mousse
6 ounces semi-sweet chocolate, chopped
3 tablespoons unsalted butter
3 eggs, separated
1/2 teaspoon cream of tartar
1/4 cup + 2 tablespoons granulated sugar
1/2 cup heavy cream, cold
1/2 teaspoon vanilla

Set a heat proof bowl over a saucepan of gently simmering water. Put the chocolate and butter into the bowl. Melt the chocolate and butter together, stirring with a whisk, until smooth. Remove from heat and cool slightly. Add the egg yolks to the chocolate one by one, beating with a whisk until incorporated. Set aside.

In another bowl, beat the egg whites until foamy. Add the cream of tartar and continue to beat. Gradually add in 1/4 cup granulated sugar and continue beating until stiff peaks form. Set aside.

In another bowl, beat the heavy cream until it begins to foam. Add the vanilla and remaining
2 tablespoons  sugar. Continue to whip the cream until it holds soft peaks. Set aside.

Gently fold 1/4 of the egg whites into the chocolate mixture to lighten it. Fold in the remaining egg whites. Then, delicately fold in the whipped cream. Take care to not over work the mousse, but make sure the cream is blended in well.

Using a rubber spatula, spread the mousse on top of the cooled cheesecake while still in the springform pan. Cover with plastic wrap.

*** If making the ganache immediately, place the mousse-covered cheesecake in the freezer as you make the ganache. (The cheesecake should NOT be in the freezer for more than 30 minutes.) If making the ganache later, place the cheesecake in the refrigerator for a few hours. ***

top layer - ganache
1/2 cup heavy cream
5 ounces bittersweet chocolate, chopped
1 teaspoon vanilla

Place the chopped chocolate and vanilla in a small bowl. Set aside.

Heat the cream in a small sauce pan over medium-low heat until the point just before it boils. Pour hot cream over chocolate and vanilla. Whisk the mixture until smooth. Allow ganache to cool for about 15 minutes.

Remove mousse cheesecake from the freezer or refrigerator. With an offset spatula, smooth the ganache while starting at the center of the cake and working outward. Be aware that the cold temperature of the cake will cause the ganache to firm up, so work fairly quickly.

Release the springform pan and cut cheesecake with a sharp knife to serve. Store cheesecake in the refrigerator, covered tightly with plastic wrap.

Yield: 1 9-inch cheesecake, serving 10-12

Buttery Tomato Pasta with Garlic & Basil

Sep 3, 2012


Tomatoes
Garlic
Butter
Basil
Pasta

Oh, and some salt. (Very important, that salt.)

This is one of those recipes that is deceptively simple. So simple you might wonder how it could be so great. Well, you see, that's just it! The simple flavors shine here and this pasta dish is just the perfect thing for a quick summer meal.

Notes: Since this dish uses just a few ingredients, make sure they are as fresh as can be.

Adapted from Lottie + Doof, originally from Michael Ruhlman


This post shared on The Nourishing Gourmet

Swiss Chard, Sweet Potato, & Feta Tart with Teff Crust

Apr 12, 2012


Hi there! Isn't it a lovely day? The tulips have bloomed into an array of pastel shades, the birds are singing outside my window this morning, and the sun is bright and beautiful. Sigh...

There's not much to share this morning that can compare with the loveliness outside. Mother Nature is an undefeated competitor in my book. Though I am feeling rather brave today... How about a delightful little tart? It's a fave. (As is basically everything I share here on this little bloggity.) But when you're craving something a little bit sweet and a little bit salty, a little bit crunchy and a little bit creamy, and a lot a bit delicious, here it is.

Savory tarts are one of my weaknesses. Especially since the discovery of a fantastic tart crust. I enjoy filling this crust with almost any combination of lovely things. Pop it in the oven for a bit and it becomes hearty, healthy comfort food at its finest.

I do hope the weather in your neighborhood is as gorgeous as it is here. Spring has sprung! And although is seems that Mother Nature has won yet again, I'd say this tart comes in pretty darn close. So go make a tart and enjoy the sunshine and blooming flowers :)

Notes: The original recipe calls for chard in the filling. If you don't have any on hand, I've also had great success with spinach in its place. I've also switched out the original tart crust for the one I mentioned above. It comes from Maria Speck and is simply wonderful. I did adjust Maria's recipe to include the teff flour of the original. Once again, if you don't have any teff on hand, regular white whole wheat flour will substitute just fine.

Adapted from Fine Cooking and Maria Speck's Ancient Grains for Modern Meals 

Brown Butter Hazelnut Marble Cake

Mar 4, 2012


Hello there! Things have been a bit busy around here (hence the lacking posts lately). But work has gotten back to normal (at least for the next two-ish days...) and the sun has finally decided it's a good idea to stay a while longer each day. It's rather tricky trying to cook and take photos all in a matter of 1.4892 hours after returning from work. So thank you, Mr. Sun. 

By the way! It's now March. Which means... Spring is that much closer. Yay!

Okay, I'm just rambling now. On to cake, shall we?

Have I yet mentioned the gloriousness of browned butter? I don't believe I have... Well, in case you haven't discovered it yet, I now tell you that browned butter is liquid gold. All sorts of amazing things start to happen when you simply leave the butter in the pan on the stove for a minute or two past its initial meltation. (Yes, I made that word up. I think it's a pretty useful one.)

Also, hello. Roasted hazelnuts are glorious. Any nut that's roasted takes on such a more complex, deep, nutty flavor. Simply fantastic.

And finally, there's really no need to mention the gloriousness of chocolate. That's a given.

What I'm trying to say here is this: That when you combine all of these glorious things into one large bundt pan, well, what do you expect? Glorious things happen. This is absolutely one of my very favorite cakes. Probably in the top three. Or two. It was inspired by a cake I found a couple of years ago and has morphed into this lovely you see today. I've tweeked almost all the ingredients - adding more nuts and chocolate, browning the butter, playing with the sweetener and flour combinations, increasing the overall batter amount, practicing my batter-swirling skills - all very important things to master, especially in the name of Brown Butter Hazelnut Marble Cake. 

I hope you enjoy this cake as much as I do. It's a beautiful every-day cake, as well as a sophisticated celebration cake. I make it whenever the fancy strikes. So basically daily. (Well... not really. That would be a little much.) It's a very fun cake to put together. There are several steps, but really, it is a pleasure to create.

Happy baking!

(Is the Mr. Sun song stuck in anyone else's head right now?)

Notes: If you want, you can use exclusively all-purpose flour in the cake. I enjoy the combination of a bit of whole grain, but the cake is quite forgiving either way. Also, I've tried this without the chocolate swirl, just not melting any chocolate for half of the batter, and it was also nice. But you know, I believe there can never be too much chocolate, so I prefer it with the swirl. On a similar note, the ganache can be totally optional. The cake is so rich and flavorful on its own that it really doesn't need the ganache. (I can't believe I just said that. No such thing as too much chocolate pour moi.) Your call.

Heavily adapted from Dorie Greenspan's Mocha-Walnut Marbled Cake in Baking: From My Home to Yours


Whole-Wheat Bagels

Jan 2, 2012


2012.

A new year. 

It's off to a great start already and I have a feeling it's only going to get better.

Better for a variety of reasons...

And the discovery of some pretty fantastic homemade bagels could even be considered one of them. I mean, really. Who doesn't love a good bagel? Toasted and smothered in butter, or cream cheese, or as a sandwich, or topped with a fried egg, or...


In that case, let's talk bagels for a moment.

You know how a great bagel shop bakes bagels that are perfectly chewy with that distinct "bagel flavor"? And they're not bready at all, but just really, really good? Well, these are basically the kind you'd get at that real-deal bagel shop. They are crispy and tough on the outside with soft, chewy, and flavorful interiors.

This recipe is adapted from none other than The Amazing Bread man, also known as Peter Reinhart. This guy knows his stuff. If anyone out there's going to create an amazing bagel, it'll be Peter. For sure. 

There are a few keys to really good bagels:

1. High-gluten flour - All-purpose flour has a protein content of about 9-12%, bread flour is about 12-13%, while high-gluten flour has about 14-15% protein content. High-gluten flour is harder for a home cook to find (but can be ordered online from King Arthur, if interested), so this recipe relies solely on bread flour, which makes for a fantastic bagel. Though, to amp up the protein content in mine and get closer to the protein levels in high-gluten flour, I add a little wheat gluten. This is not imperative, but if you have some, throw it on into the bowl. It'll only do good.
2. Barley malt syrup - This is the other ingredient that is distinct to bagels. It gives them that malty flavor and really isn't hard to find. Barley malt syrup is available in most supermarkets, so it's worth a look. If you can't find it, simply substitute an equal amount of honey.
3. Time - Long, slow fermentation releases all sorts of subtle flavors trapped in the flour and simply takes any and all breads to another level.
4. Poaching - Boiling the bagels before baking them pre-gelatinizes the outside of the bagel and works to also produce a chewy interior.


So. Basically, these bagels are a sure-fire way to get your year off to a great start. A new year filled with fresh bagels. Sounds pretty good to me.

Notes: Not surprisingly, although the original recipe calls for exclusively bread flour, I've used a bit of whole wheat flour. I also threw in a smudge of wheat gluten to amp up the chewy factor. The wheat gluten is not imperative, though helpful. As far as toppings go, garnish away as your heart desires. I've included a few ideas in the recipe as well as a variation for Cinnamon-Raisin bagels. And finally, you should probably double this recipe. Just sayin.

Adapted from Artisan Breads Every Day, by Peter Reinhart


Pumpkin Yeast Bread

Oct 28, 2011

.
Is that not just the cutest loaf of bread you've ever set eyes on? I know, right? Not only is this loaf shaped like a pumpkin, but it tastes like one, too.

Pumpkin-y goodness.

Oh, yum.


AND!

Lest I commit an unpardonable sin and forget to mention... It makes for just about the best darn French Toast I've ever pulled off the griddle. And I believe that my dear mother would wholeheartedly agree with me. Yes, we love us some pumpkin spice French Toast slathered in butter and topped with plenty of pure maple syrup. Especially on cool mornings like this one, bundled in our fleece pj's, reading the morning paper together.

This, my friends, is what Autumn is all about.
.

Notes: The original recipe calls for exclusively bread flour, but I found it worked wonderfully with a bit of hard whole-wheat, too, and gave it just a nudge more of the heartiness that I love. Use what you have on hand. I suspect that even all-purpose flour would do alright in place of the bread flour, though the dough will not have as strong of a rise or quite as structured of a crumb. Baking this dough in two loaf pans with a few slashes cut on the top of each would work just fine - for convenience's sake on those busy days.

Adapted from The Big Sur Bakery Cookbook


Applesauce Cake with Caramel Glaze

Oct 11, 2011


Welcome, my favorite season of the year! Welcome crunchy leaves, red apples, crisp air, cinnamon, and big cozy sweaters. Oh, how I've missed you so. 

To me, this is the most wonderful time of the year.

If anything says Autumn - it's this cake. Applesauce Cake with Caramel Glaze, to be more specific.

I've made this cake exactly three times in the past week and a half. It's so good I probably should have made it more, now that I think about it in terms of numbers like that. Every time I got out a glass bowl and the mixer, my sister would say something along the lines of, "Let me guess.... The Spice Cake again?" I would proudly answer in the affirmative with a firm nod of my head. And then she would slowly saunter away with a slight grin on her face because she secretly loves this cake as much as I do, but for some reason thinks it's silly that I've made it so much lately. I, on the other hand, will not be shy when it comes to something so perfect for the season. I'll make The Spice Cake as much as I want, thank you very much.

This cake has taken its place as my current favorite (wouldn't ya know!). Thanks to the loads of applesauce, it is so absolutely moist. The applesauce also gives the cake a perfectly subtle apple flavor. And when a generous amount of cinnamon and spice is added, wonderful things begin to happen. AND then.... I won't even say how completely heavenly the caramel glaze is - I'll leave that one up to you to decide as you sneak a taste or two of the dripping glaze. (It's okay. I'll be the first to admit I did it too. Not shy about this cake, remember?)

Please make this cake. You will be filled with all sorts of Autumnal joy if you do. Promise.

Notes: Since my dad tends to two apple trees out back, we have an abundance of canned homemade applesauce in the basement. If you are so inclined, make a quick batch of your own - homemade applesauce is simply the best. It's lovely in this recipe, too - so fresh and flavorful. I made a few of my own tweaks to the original recipe, of course. First of all, I one-and-a-halved the recipe because I like my bundt cakes nice and tall, with about 3 cups of total flour. It's the perfect amount for a 12-cup bundt pan. Also, I used a couple of whole-grain flours along with a bit of all-purpose. If you don't have the whole-grains on hand, certainly all-purpose can be used for all 3 cups of flour. I also decreased the amount of sugar because the applesauce is so sweet itself, I didn't feel that the cake needed any more, especially with the rich caramel glaze. And last, but certainly not least, olive oil replaced the vegetable because I simply love olive oil in cakes like this. It's a barely noticeable taste, but works perfectly here.

Adapted from Food 52


Oatmeal Pancakes with Blueberry Maple Compote

Jun 4, 2011


What were you doing at 4 am this morning? Sleeping, I hope.

I'm usually sleeping at that hour, too. Not today, though. Nope, I wasn't asleep.

I was awake. Do you ever wake up early (as in, super early), still exhausted as can be, with a million thoughts running through your head? And you lay there for hours upon hours mad at your silly little noggin' for being so rude to keep you from your beauty sleep? I do. That's why I was awake at 4 am this morning.


Well, as it happens, one of those million thoughts running through my head was something like, "Hmmm.... Since I'm just laying here with nothing to do (heaven forbid I actually sleep!) in my pitch-black room, what'll be for breakfast today?" A few things crossed my mind but I promptly settled on oatmeal pancakes with blueberries because, well, it sounded scrumptious. I eventually made my way up to the kitchen (still pitch black out, yes), pulled out a few bowls and the griddle, and made a batch of my favorite pancakes.

Lending moisture and texture, the cooked oatmeal in these pancakes makes them extra-tasty. A bit of molasses compliments the nutty oats quite nicely. And when served warm with a bit of blueberry compote, you've got yourself a pretty good reason to get up early (meaning 7 or 8 am, not 4).

Notes: You can use all-purpose flour instead of the whole-wheat pastry, if that's what you have in your cupboard. Also, frozen or fresh berries will work equally well in the compote.

Pancakes adapted from Good to the Grain, Blueberry-Maple Compote a Flour Sack original


This post linked to Read Food Wednesdays and The Nourishing Gourmet

Peanut Butter Sandwich Cookies

May 29, 2011


Raise your hand if you like peanut butter. Ah, yes, I see. You all do. That's good. I do too. In fact, I really like peanut butter. I didn't always, though. You see, when I was little, the only thing "peanut butter" that I'd eat was Reese's Peanut Butter Cups. No PB & J sandwiches, no PB cookies, and certainly not a scoop right from the jar! The horror.

One time I remember I had the hick-ups and my sister told me that if I wanted to get rid of them I'd have to eat a spoonful of peanut butter from the jar. I must have been pretty desperate for a cure because I somehow summoned the courage and did that thing where you plug your nose so you can't taste what's in your mouth. As soon as the peanut butter was down, I unplugged my nose and remember immediately tasting what I then thought was a repulsive flavor. (Annnnd it didn't even cure my hick-ups! What a crock.)

I'm not sure what remedied my dislike of peanut butter, though I do remember an instance when I realized it might not be too bad. I was probably in the 5th grade when I came home from school one day to quite the surprise. Mom had just pulled fresh cookies out of the oven and there they sat, warm on the counter. I was so excited because this pretty much never happened. Mom said they were Peanut Butter Chocolate Chip Cookies. Immediately I fell from pure elation at the fact that Mom had made cookies to utter disappointment that they were peanut butter. "She finally makes cookies for an after school snack and she makes peanut butter cookies?!" Well, I was somehow convinced to try one and lo and behold! I liked it. Loved it, actually. And that was that. Now I would eat Reese's and Mom's Peanut Butter Chocolate Chip Cookies. Progress...


Which brings us to today. I'm happy to report that I've made even more progress. (I feel like I'm reporting to some recovering addict group or something when I say that...) Though I don't find myself practicing restraint when a jar of peanut butter is near and I have a spoon in hand, I do like me some peanut butter. Preferably with a little oatmeal, flour, butter, and sugar. But that's the best way to have most things, wouldn't you agree?

I think it would now be appropriate for me to share the recipe for Mom's Peanut Butter Chocolate Chip Cookies. But we have a problem, because I didn't make them. Soooo, I'll make them soon-ish and then you'll all see why they cured me of Peanut-Butter Hate. But for now, these little sandwich treats are amazing. You're not receiving the short end of the stick by not getting Mom's cookie recipe today, I promise.

I've made these little guys many, many times and they do not disappoint. Consider them a more-refined version of peanut butter cookies. These cookies are delicate yet full of peanut butter flavor. They are nutty and creamy and crumbly and they melt in your mouth like only a good peanut butter cookie can do. I don't really know what else to say about them except that they are SO good. And I really want you to make them because, as we have just established, we all love us some peanut butter, right?

Notes: I've made my regular substitutions to the original recipe, but if you don't have whole-wheat pastry flour or sucanat, you can use all-purpose and brown sugar in their place. The filling recipe makes more than I've ever needed for one batch, but I suppose it all depends on how much filling you like in your cookies. Try the whole recipe for the filling and if you have left-overs, hey, you've got an excuse to make more cookies, right? Also, I discovered that I prefer these straight from the freezer. They don't get rock-hard like most cookies do when you freeze them for some reason, they just get really good. How's that for vague? :) Of course, they're lovely at room-temperature, too. Enjoy!

Adapted from Martha Stewart


Spinach Strata

May 25, 2011


The garden out back is beginning to produce an array of beautiful vegetables. My dad is an avid gardener, and those vegies are like his little babies. He grows everything from seed - beginning in a make-shift "greenhouse" he places beside our grand piano. As the weeks progress, the little black tubs of plants begin to overflow and create a small forest in the front room. (Apparently this is the best space in the house for as much sunlight as possible. He says he needs the space until he builds himself a real greenhouse outside. Mom is very patient and goes along with it well... Happy to see the fruits of her husband's in-door jungle when she bites into a juicy, ripe, rosy-red tomato in August.)


We've been munching on crisp spinach leaves for several weeks now. The earthy, fresh flavor of just-harvested greens is hard to beat. To me, spinach + olive oil + lemon is a trio made in heaven. At dinner, I love the leaves dressed simply - with a drizzle of olive oil and a squeeze of fresh lemon. But at breakfast, fresh spinach decorated throughout a rustic strata and combined with a bit of feta and oregano is the perfect way to start the day.

I have been making this strata almost weekly since I first discovered it. It is hearty, moist, and extremely flavorful. The top gets nice and brown in the oven, creating a lovely crunch. I admit, I've been guilty of stealing extra crispy bits to put on my breakfast plate. With the subtle, light taste of lemon, a bit of olive oil fruitiness, and a little saltiness from the feta, this strata is wonderful. I might also add that it is a snap to mix up. You put it all together the night before you want to serve it, and then bake it in the morning. I think this strata is a perfect way to use some of the abundant spinach out back. Dad agrees.

Notes: I've increased the bread quantity slightly because I found the strata a bit wet with just the 8 ounces originally called for. If you don't have day-old bread, you can dry fresh bread in an oven heated to 250°F for 10 to 15 minutes. I've been making this with regular homemade whole-wheat sandwich bread, but any dense whole-grain bread will do.

Adapted from Super Natural Every Day


Oat Soda Bread

May 11, 2011


Do you ever crave fresh homemade bread but don't have the time or patience to wait a few hours for yeast to work its magic? I certainly do. And lucky us, I have the solution to our little predicament right here. It's called soda bread. Have you heard of it? Soda bread isn't made with soda - as in soda pop - no, soda bread is made with baking soda as the leavener, and when combined with buttermilk, wonderful things happen, like bread rises.

Soda bread is known for its very short ingredient list, usually going something a little like this: flour, baking soda, salt, and buttermilk. Sometimes people like to add raisins or nuts to their soda bread, but I like to keep mine pretty simple. Here is a wonderful version of soda bread made with oats, which provide just a touch of sweetness and texture.

Delicious, warm, hearty homemade bread in less than an hour? Yep. I speak the truth. Serve this bread warm with a slather of salted butter, or alongside a steaming bowl of soup, even toasted with a shmear of peanut butter... you can imagine the possibilities. I told you I had the solution to our little predicament. And a pretty darn good solution it is, might I say.

Notes: This recipe calls for oat flour. If you are more likely to have some rolled oats on hand, I've included below the recipe how to make your own oat flour with rolled oats. If you already have oat flour in your pantry, go ahead and use it! Also, if you would like, you can use a full 2 1/4 cups of all-purpose flour, instead of the whole-wheat pastry and all-purpose combo.

Adapted from 101 cookbooks

Related Posts Plugin for WordPress, Blogger...

The Flour Sack All rights reserved © Blog Milk Powered by Blogger