December 14, 2011
Dear Fellow Chocolate Lovers of the World,
I hope this letter finds you in good health and joyous spirits. Since our last correspondence, I have made a monumental discovery. Dear friends, I have found our Holy Grail of all things good, beautiful, and, most important, chocolate. Yes, indeed. This is it!
Behold - Mississippi Mud Pie.
Versions of Mississippi Mud Pie vary wildly in interpretation and mean many things to many people. Most are encased in some type of cookie crust, though, but whether that be chocolate, graham, or vanilla is up for personal interpretation. To some, Mississippi mud pie includes bourbon and nuts. To others, Mississippi Mud Pie is not really Mississippi Mud Pie without a thick layer of coffee ice cream hiding below a cloud of marshmallows. Despite these differences, the signature of a true Mississippi Mud Pie is that it is chocolate-based in one way or another.
This version just happens to be chocolate-based in
all ways. Or in other words, this is the best one. Ever.
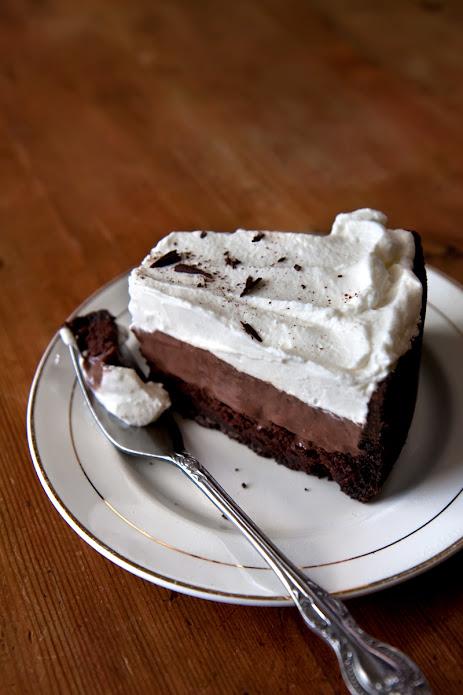
What makes this Mississippi Mud Pie the best one ever, you ask? Ah, a good question to challenge a bold statement on my part. But I assure you, it won't take much convincing for you to realize the truth of my statement. Now, where do I begin? I supposed the crust would be an appropriate place to start. Encasing the entire pie is a tender, pure black cookie-crumbled crust. It is made from real, homemade chocolate wafers which are then pulverized to a fine crumb and finally mixed with a bit of butter to hold it all together. After the crust has visited the oven for a few minutes, a thick (almost) flourless cake batter is poured in. This layer bakes up into a dense, almost gooey confection; imagine a cross between an intensely chocolaty brownie and a light soufflé. Yeah, it's good. As we continuing moving up the layers we next find ourselves a lovely layer of dark chocolate pudding. Rich with whole milk and a generous bunch of egg yolks, this stuff is creamy, smooth, and purely delightful. And finally, please tell me, what dessert is complete without a great big dollop of lightly sweetened whipped cream on top? None. You are right. Sprinkle on a few pinches of chocolate shavings to make the whole thing look nice and pretty and there you have yourself the best Mississippi Mud Pie. Ever.
So, my dear chocolate appreciators, make one of these babies for yourselves and you will see. You will see that I have indeed found our Holy Grail.
Hello, chocolate.
We love you.
Forever your all-things-good-beautiful-and-chocolate-loving friend,
Brooke
Notes: First off, this cake is intense. Intense in every sense of the word, pretty much. That said, it is really amazing. This Mud Pie is worth every single minute you put into it. And, of course, it is so much fun to make! I know it is a long recipe; it does have a lot of steps. The first time I made this cake it took me... all day. I've made it numerous times since then and have found a few short cuts (which I've tried to include below) so it only takes me a couple hours total to whip up. A word of advice: Start the cake in the morning because each of the steps requires a bit of chilling before moving on with the rest of the recipe. So... Also, read the whole thing before you get started, as is always the practice of a good chef.
This recipe is based off the Mississippi Mud Pie in Matt Lewis and Renato Poliafito's Baked Explorations. Their version includes each of the components I include in mine: an (almost) flourless cake baked in a chocolate cookie crust, covered with a rich chocolate pudding and a thick layer of whipped cream. My main tweaks to the original Matt and Renato created are that I make my own chocolate wafer cookies for the crust and I use a recipe from Alice Medrich for the (almost) flourless cake. To save yourself one step in this process, you can certainly use 16 ounces of chocolate wafer cookies instead of baking your own. You will still pulverize the cookies to a fine crumb and mix the crumbs with the 5 tablespoons of melted butter.
You will love.
Chocolate cookie wafers and cake adapted from Bittersweet, by Alice Medrich
Pudding and assembly adapted from Baked Explorations, by Matt Lewis and Renato Poliafito
Mississippi Mud Pie
chocolate cookie crust
1 cup whole wheat pastry flour
1/2 cup + 1 tablespoon unsweetened cocoa
1/4 teaspoon baking soda
1/4 teaspoon fine grain salt
4 tablespoons unsalted butter, at room temperature
1/4 cup light brown sugar
1/3 tablespoons granulated sugar
1 teaspoon vanilla
3 tablespoons whole milk
4 tablespoons unsalted butter, melted
Preheat oven to 350°F. Place a piece of parchment on a baking sheet. Set aside. Line the bottom of a 10-inch springform pan with a parchment round, then lightly butter the pan and parchment. Set aside.
In a medium bowl, whisk together the flour, cocoa, baking soda, and salt. Set aside.
In a medium bowl, beat the softened butter and sugars until light and creamy. Add the vanilla and milk and mix until well combined. (Mixture may look curdled.) On low speed, add the flour mixture just until incorporated.
Use a small cookie scoop to drop little mounds of dough onto the parchment-lined baking sheet. Using lightly floured hands, press the mounds of dough into 1/4-inch flat disks. (Don’t worry about making these too neat - you’ll be grinding them up shortly.)
Bake the cookies for 10 minutes, until the cookies puff and then settle slightly when done. Remove cookies from the baking sheet and let cool to room temperature. (A 10 minute pop in the freezer works well to speed this process up.)
Place cooled cookies in a food processor. Process until cookies are evenly and finely crushed. Pour the melted butter on top of the crushed cookies and pulse until well mixed. Turn the crumb mixture into the prepared pan and press it into the bottom and up the sides, leaving about 1/2-inch between the top of the crust and the top of the pan. Use the bottom and sides of a cup to get an even, firm layer of crust on the bottom and sides. Place the pan in the freezer and let the crust set for about 10 minutes
Bake the crust until dry to the touch, about 10 minutes. Transfer to a wire rack and let cool.
cake
3 ounces bittersweet chocolate, finely chopped
1/2 cup unsweetened cocoa, sifted
1 cup sugar, divided
1/2 cup boiling water
2 eggs, separated into 2 yolk and 2 whites
1 tablespoon vanilla
1/4 teaspoon cream of tartar
1/4 cup whole wheat pastry flour
Increase oven temperature to 350°F.
In a large bowl, combine the chocolate, cocoa, and 3/4 cup of the sugar. Pour in the boiling water and whisk until the mixture is smooth and the chocolate is completely melted. Whisk in the egg yolks and vanilla, then whisk in the flour. Set aside.
Using a stand mixer fitted with the whisk attachment, combine the egg whites and cream of tartar. Beat until soft peaks form. Gradually sprinkle in the
remaining 1/4 cup sugar and beat until stiff but not dry.
Gently fold about a quarter of the egg whites into the chocolate mixture to lighten it. Fold in the remaining egg whites until they are almost completely combined, taking care to not overmix.
Scrape the batter into the cooled crust and level the top if necessary. Bake for about 20 minutes, until just set and a toothpick inserted into the center comes out with a few moist crumbs clinging to it. The cake will develop a bit of a crust on top. Cool on a wire rack for 30 minutes, then transfer to the refrigerator to chill for at least 3 hours. (The cake may sink and crack a little like a soufflé as it cools.)
pudding
3/4 cup sugar
1/2 cup unsweetened cocoa, sifted
1/4 cup cornstarch
1/4 teaspoon fine grain salt
4 egg yolks
2 1/2 cups whole milk
3 tablespoons unsalted butter
2 teaspoons vanilla
3 ounces bittersweet chocolate, finely chopped
As the cake is baking in the crust, prepare the pudding. In a large bowl, whisk together the milk and egg yolks until completely combined. Set aside.
Set a medium saucepan on the stove but do not turn the heat on yet. Add to the saucepan the sugar, cocoa, cornstarch, and salt. Slowly whisk in the milk and egg mixture, starting with just about a 1/2 cup of the milk mixture. Whisk this until it is smooth, then add the rest of the milk mixture in 1/2 cup or so increments until it is all mixed in. The pudding should be very smooth and free of any little lumps.
Turn on the heat and bring the mixture to a boil, whisking constantly to prevent the pudding from burning to the bottom of the pan. Boil for 30 seconds, then transfer it to a large bowl. Add the butter, vanilla, and chocolate. Whisk until combined and then for a few more minutes to cool the mixture slightly. Let the pudding stand for 15 minutes at room temperature then cover with plastic wrap and chill for at least 3 hours.
whipped cream
1 1/3 cups well-chilled heavy cream
1/4 teaspoon vanilla
2 tablespoons powdered sugar, sifted
When all components of the cake are chilled and you are ready to assemble the cake, pour the cream into a bowl and beat with a whisk for about 1 minute or until soft peaks form. Sprinkle the sugar in and add the vanilla. Continue whisking vigorously until stiff peaks form.
to assemble
Stir the pudding to loosen it, then pour it on top of the cake, making sure to stay inside the cookie crust border. Use a spatula to spread the pudding evenly. Return the cake to the refrigerator for at least 30 minutes.
Spread the whipped cream across the pudding layer, all the way to the sides. Sprinkle with chocolate shavings, if desired. Unmold the cake and serve
immediately.
The cake can be kept, covered, in the refrigerator for up to 3 days.
Yield: One 10-inch round cake


